These are the plans and design for the 4th version of the aquaponics system that we’ve made. It’s amazing how much is learned by simply creating aquaponics systems and testing them out.
What is Aquaponics
Basically, it’s a fish tank that lets you harvest the fish, and uses vegetables to clean up the tank.
- Pump water to the fish
- Aerate, circulate, separate solids
- water falls by gravity to the plants
- plants clean it, grow healthy, and return it to sump
Fresh organic fish and veggies grown year round in a small area, with 85% less water than normal farming.
How this Aquaponics System Works
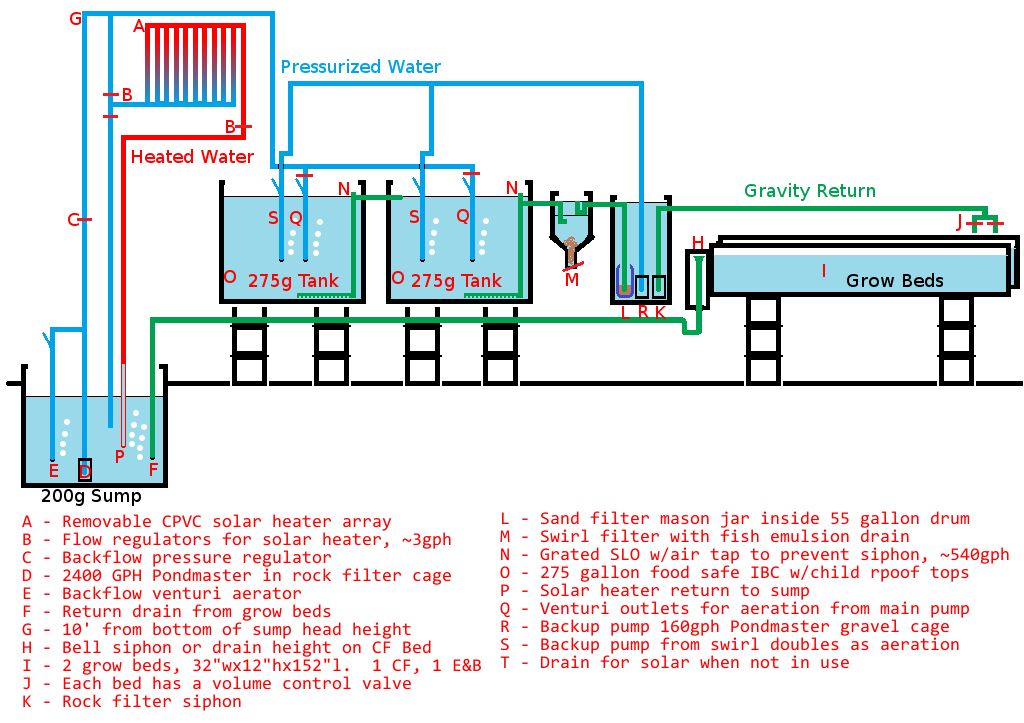
A. Solar hot water heater (thermo siphon design). CPVC pipes on a 4×8 sheet of plywood, clear plastic (or glass) lid to trap the heat. Thermodynamics principles lets me put cold water in, and it will rise as hot water to the output. This needs about 2.5 gallons per minute flow. Too fast and it doesn’t work as intended, too slow and it will literally melt down. Heating water is about $100 a month if you use other methods. This cost about $150 to build. I could pump it through underground pipes to heat the entire greenhouse if needed, or to a rabbit hutch, etc. It’s hot water, about 180F (regulated by how fast water goes through it). I may need a way to mix it back with cold water before it hits the tanks. I might also need a separate pump instead of a valve to control pressure. If I were in too cold of a climate this wouldn’t work the same and I’d need additional heat.
B. Bypass valves for solar hot water heater in warm months. I can close the in/out and open the bypass and water will not go through the heater at all. Fish and plants need certain temperatures to reproduce, grow fast, fight disease, and keep metabolism up (eat and poop). Without these elements, the system grows slower or things die.
C. Backpressure valve for sump aerator. I have a large pump (2000 gallons per hour) in the sump. But I only need to pump about 500 gallons per hour for the purging of the tanks and bringining in clean water. I redirect the backpressure by adjusting this valve. Now my pump can just pump full time, which is better for it. turning a pump on and off reduces it’s life. Also, this backpressure is used to really blast air into the water. Traditional air stones only last a few months. Instead of buying new ones, I did this to aerate the water. Saves electricity, manufacturing, breakable parts, etc. If I need to, I can also spray this water into the air and let it fall further. this would allow me to cool the water. I don’t think this will be an issue, but it’s a simple modification to allow this. I’ll have a series of 1/4″ holes on a horizontal pipe to shoot jets all over into the sump and make sure there isn’t a solids build up. This aquaponics system design also allows me to regulate the speed at which the grow beds fill by limiting how much water goes into the system.
D. Sump pump on a float. 250 gallon tank of clean water, little to no solids. Gravity and cut off switch combined keep sump from overflowing or burning up. It won’t pump out more than it can take in if I adjust things properly and monitor it daily.
E. Sump pump aerator. Backpressure from the valve above allows some water to continue and some water to go through an aerator back into the sump. This makes it easy to use a larger pump and aerates water for fish before it even gets to them. It is hard to have too much oxygen in the water. All of these aerators help to off gas toxins too.
F. Drain back from grow beds should be clean as it is filtered many times, at least clean enough for fish to live in. Venturi process injects air for additional aeration with zero maintenance and pumps, using gravity to aerate water instead.
H. Bell siphon, one per grow bed. All of them drain back to sump tank (EDF area). A bell siphon is a device that autsiphons water out to the bottom once it reaches the top. No mechanical parts/motors, just physics and gravity. By using this I can flood beds and then drain them out repeatedly without pumps or timers. The natural fill and drain cycle is the timer, controlled by how fast water enters.
I. Grow beds. Gravel inside of a large trough lined with pond liner. You can have up to 2:1 ratio of water for the grow beds. So, if I had 2 IBC 270 gallon tanks of fish (540g total), I could support about 8 grow beds that are 8′ long x 2′ wide x 12″deep. The 12″ depth is important for many reasons. It keeps plants healthy by not rotting the roots, shades water so algae doesn’t grow (if water isn’t pumped too high before draining), and provides a stratification of the various elements of fish poop sludge for worms, oxygen and bacteria to clean the water and break down ammonia into nitrates/nitrites. This is a natural process that takes about 8 months to grow a full production bacteria colony. The plants in turn, eat up the nitrates, and you get clean water as a byproduct back to (F). I Need to make sure I can never get into a race condition where the beds are full, but the sump shuts off because it’s empty.
J. A valve to each grow bed allows me to control the flow, and thus how fast the tanks flood and drain. I can grow different types of plants this way because not all plants like the same amounts of water. Isolation of grow beds also isolates pests and allows me to only damage some of the crop if I’m infested. It gives me more time and ability to manage the crops.
K. This is a gravity fed drain that filters waste from the sand filter before it gets to my grow beds. This entire tank (LRK) is designed to mechanically separate solids (fish waste) so I have water that is easier for the worms and plants to break down and so that my pumps stay clean longer. If I don’t manually filter solids, I might fill up my grow beds with more sludge than they can process, and that would kill everything. By filtering solids like this, I also keep the valves healthy and clean. If they are not clean, I have to tweak them and purge them often as they clog up.
L. Sand filter. Gravity pours partially filtered water from the swirl filter into sand in a jar. This chews up and breaks up remaining solids before it goes on. Maintenance free, cheap, perfect. Eventually I have to replace sand and possibly the nozzle, but this is very low maintenance.
M. Swirl filter. Mechanical separation of fish waste. The tanks use a siphon (N) that has a T on it open to the air to prevent a complete siphon. Gravity pushes it through tanks and it sucks up the waste off of the bottom. The solids go into a cone where they settle to the bottom. I can then purge this portion every few days and have super rich fertilizer for regular dirt gardens. This is also a way to get the fish poop out of the system, allowing me to stock more fish than I should be able to. The input pipe is lower than the output pipe to help solids go down by gravity and swirl instead of up into the sand filter.
N. SLO is a system of siphoning water from the bottom (and thus getting the solids lifted). A “Tee” at the bend ensures that water doesn’t autosiphon out past a certain level. The pipe on the bottom is a 4 way T that has vents cut into it to keep fish from entering, and to spread out the area of available suction and help prevent dead spots.
O. Fish tanks. IBC containers, food grade 275 gallon each. More water means a more stable system from temperature chagnes, PH, etc. I’m also able to hold about 1 fish for every 2 gallons safely. I have chosen 2 tanks because a large one is 2x as expensive, but also because I can sort my stock. One tank could have full grown adults, ready to be harvested, and another tank could have smaller fish that might get eaten by the larger ones. I could also put a stack of pipes in and have 3 or 4 breeders for this tank. In addition, this design is highly modular. You can just keep adding tanks, growbeds (and eventually more sump space) as needed.
P. Hot water return. Hot water is expensive. This is fed from the solar heater array above. A clear section allows me to make sure it’s flowing, and not stagnant up top.
Q. Venturi snakes. This is my design/idea. I will inject air (via gravity) at the top and use a flexible hose at the bottom with a sprayer head. This should move around randomly in the tank disturbing the bottom and not allowing dead spots while at the same time aerating the entire tank. This would not be necessary if I had cone bottom tanks, but those cost about $400 -$700 each and IBC tanks are only $120 each, delivered. The pressure is regulated from the sump backpressure valve (C). I can control how fast water flows into the entire growbed system by adjusting (C), and I can individually control turbulence in each tank with (Q and R). Different aquaculture likes different amounts of water running through it.
R. Backup Aerator. In the event that my sump pump dies, the grow beds will drain and it will fill up. Plants are fine for a few days without water flowing, unless it’s 115F outside. However, fish will die within hours without aeration at any temp because of how dense the fish population will be. And within days or several hours without filtration of the ammonia. I’m not able to filter ammonia out, but I can purge as much solids as possible still because this pump moves things through the swirl filter and sand filter. Also, the down spouts will be under pressure as nozzles that spray into tank, or as venturi aerators. This gives me a chance to swap pumps in case of a single pump failure with much less danger to fish. Because it’s pumping mostly clean water (swirl filter + sand filter), this pump should require very little maintenance. Stopping one of the pumps for any reason (maintenance or emergency), still aerates the water.
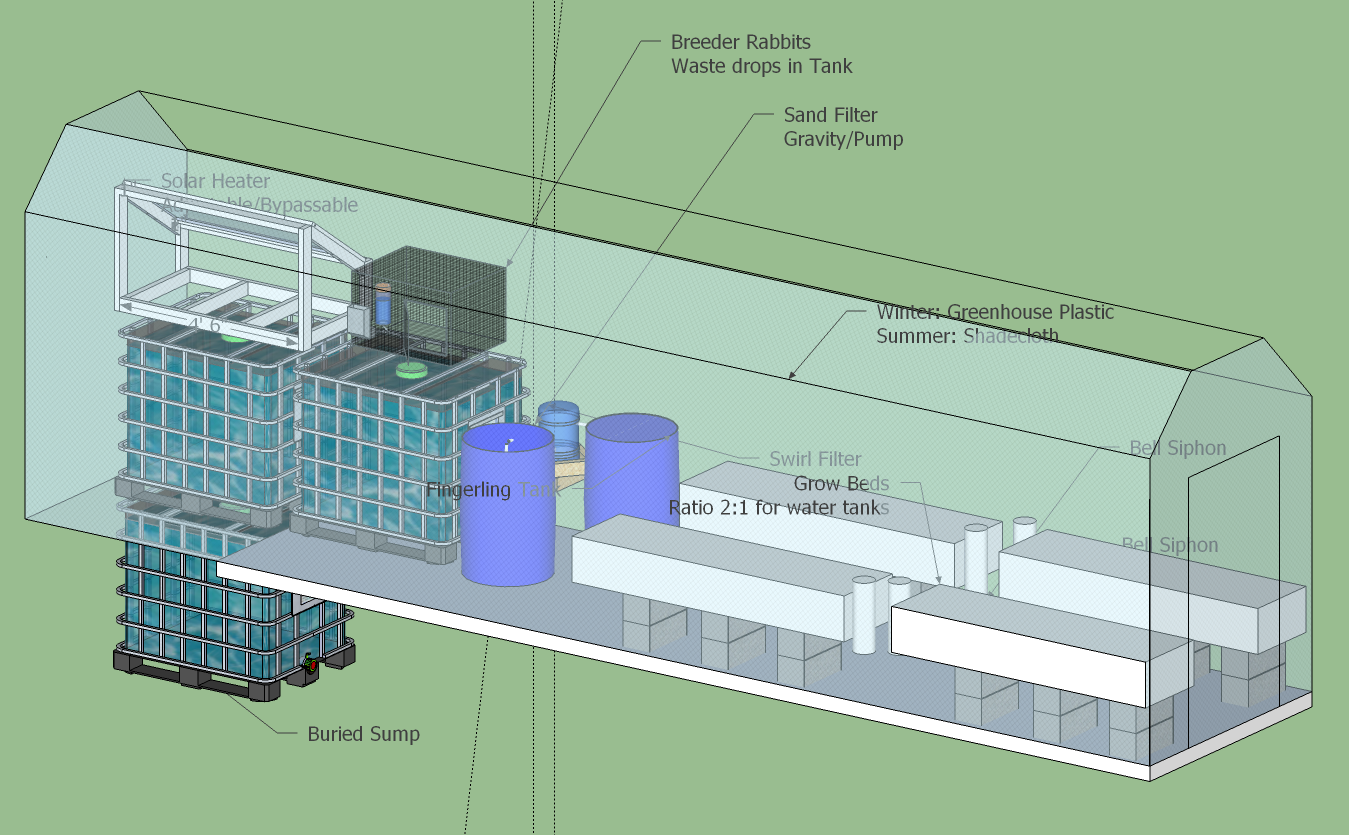
Greenhouse
Everything is up on cinder blocks and 2×4 as needed to get the proper height. It will go inside of a greenhouse/shadehouse to regulate temperature and protect against pests (neighbors or cats have been getting trash into my yard, specifically in the aquaponics).
The greenhouse/shadehouse is designed to have clear plastic or shadecloth as needed, and a slightly raised gravel floor from the several tons of river rock I purchased for the front yard. We built it out of aluminum pipes lashed together and then anchored to a brick wall on one side and the ground on the other.
Care has to be taken that a hot day doesn’t suprise us and cook everything inside.
Water Cooling Methods
If needed, I could cool the water by pumping it down underground instead of above ground (thank you for the idea Mike).
A less labor intensive way that will work for me though is probably to keep the water shaded and insulated, and to spray the water into the air back into the sump for evaporative cooling. This evaporative cooling will cost quite a bit of water though, so if it was extremely hot for extended periods of time, the underground heat sink would be a perfect solution worth the effort. I haven’t researched it, but I imagine an array like the solar heater, but angled so hot water goes into the top and cold water flows down the sump would be what I want. Perhaps something simple like a snake back and forth through the earth would work too – I would just have to be careful of pipe resistance and make sure drain beds could drain fast enough.
Pricing
I suspect the entire system will be less than $2500 considering all parts, and the hired labor that I had help me build the greenhouse. I also think it will cut our grocery bill down to $100 a month total for electricity, stuff we can’t grow, and maintenance. In addition, it’s 100% organic, fresh, and healthy. I eventually want to sell the fish too for income and the entire project is a “business” so it will be a tax write off until it makes a profit. I found I out I need special permits to legally eat fish that I raise for myself (go figure). Here is a list of some of the components:
- $250 – 150 Tilapia fingerlings + Overnight shipping
- $360 – 3x Food Grade IBC tanks. 275 Gallon each, 250 gallon usuable.
- $300 – Sump Pump, 2000 GPH, 22′ lift, 1.5 amps
- $50 – Sump shut off switch
- $150 – estimate on PVC parts, gaskets, valves and glue where needed
- $150 – solar water heater parts, boards, pipes, glue, special caulk, glass
- $250 – Greenhouse parts, shadecloth, clear vinyl tarp
- $40 – Cinderblocks, Misc Lumber
- $160 – Firestone EPDM Pond Liner 45 Mil – 10 x 10 Feet
- $200 – Lumber for grow beds
- $20 – 55 gallon food grade barrel
- $35 – secondary pump
- $25 – pH, Ammonia, Nitrate Test Kits
- $100 – estimate on gravel
- $20 – clear vinyl tubing
- $250 – Labor to dig sump, posts, help build greenhouse
- $150 – Starter plants, seeds, seaweed extract, spray bottles, etc
- $??? – Government meddling, or right to exist taxes (licenses, fees, etc to eat tilapia)
That comes out to $2460 approximately before licenses.
Additional Things I’d Like….
- $300 – Backup, hot standby, Sump pump like first one
- $35 – backup, hot standby, Aerator pump like first one
- $750 – Off Grid Solar Array (2 panels, inverter, regulator, battery bank for overnight use)
- $150 – other aquaculture
- $200 – plants instead of seeds
- $350 – Backup generator and a week’s fuel … just in case
The efficient aquafarmer could spend another $1750 on things to prevent disasters and speed things along/add variety of crop. I bought the backup pump, and am investigating batteries and a hot standby switch, but solar is so expensive and it’s only for if zombies attack so I can’t really justify it.
Maintenance Costs
- As Needed – Estimate 1-4 days, purge swirl filter
- As Needed – trade or sell fish/veggies
- Daily – monitor water levels and temperature
- Daily – check plants for harvest, pests, health
- Daily – monitor fish while feeding, look for spots, damage, odd behavior, deaths
- Weekly – top off evaporated water ($5/month)
- Weekly – pH, Ammonia, Nitrate tests… as needed (10 minutes)
- Weekly – Sort stock by size, verify density
- Monthly – clean filters (20 minutes)
- Monthly – monitor and plan for upcoming crops based on weather changes (1-3 hours)
- Monthly – Water bill ($4-$5)
- Monthly – Electricity bill ($8 monthly, .95A/105W pump @ 10.5 per Kw/H 24×7)
- As Needed – Fish food can be grown, free, or purchased
Space Used
It all fits in a 6′ by 30′ space as designed, which is enough for just about any backyard in the US. I can fit 3 of these and still have a backyard – and I have a pretty small back yard.
Chickens and Rabbits
I also plan to have chickens (for eggs) and rabbits (for meat and to sell) inside this system. Their waste will drop into the tank and be processed just like the fish waste. This will add a variety of nutrients and minerals as the bacteria breaks it down and make clean up of the animals much easier while providing additional protein choices – that is still a way off though. I also need more planning, and probably more filtration (a second system). I’ll have to be careful to wash greens first if I do this.
Progress Pictures (updated frequently)
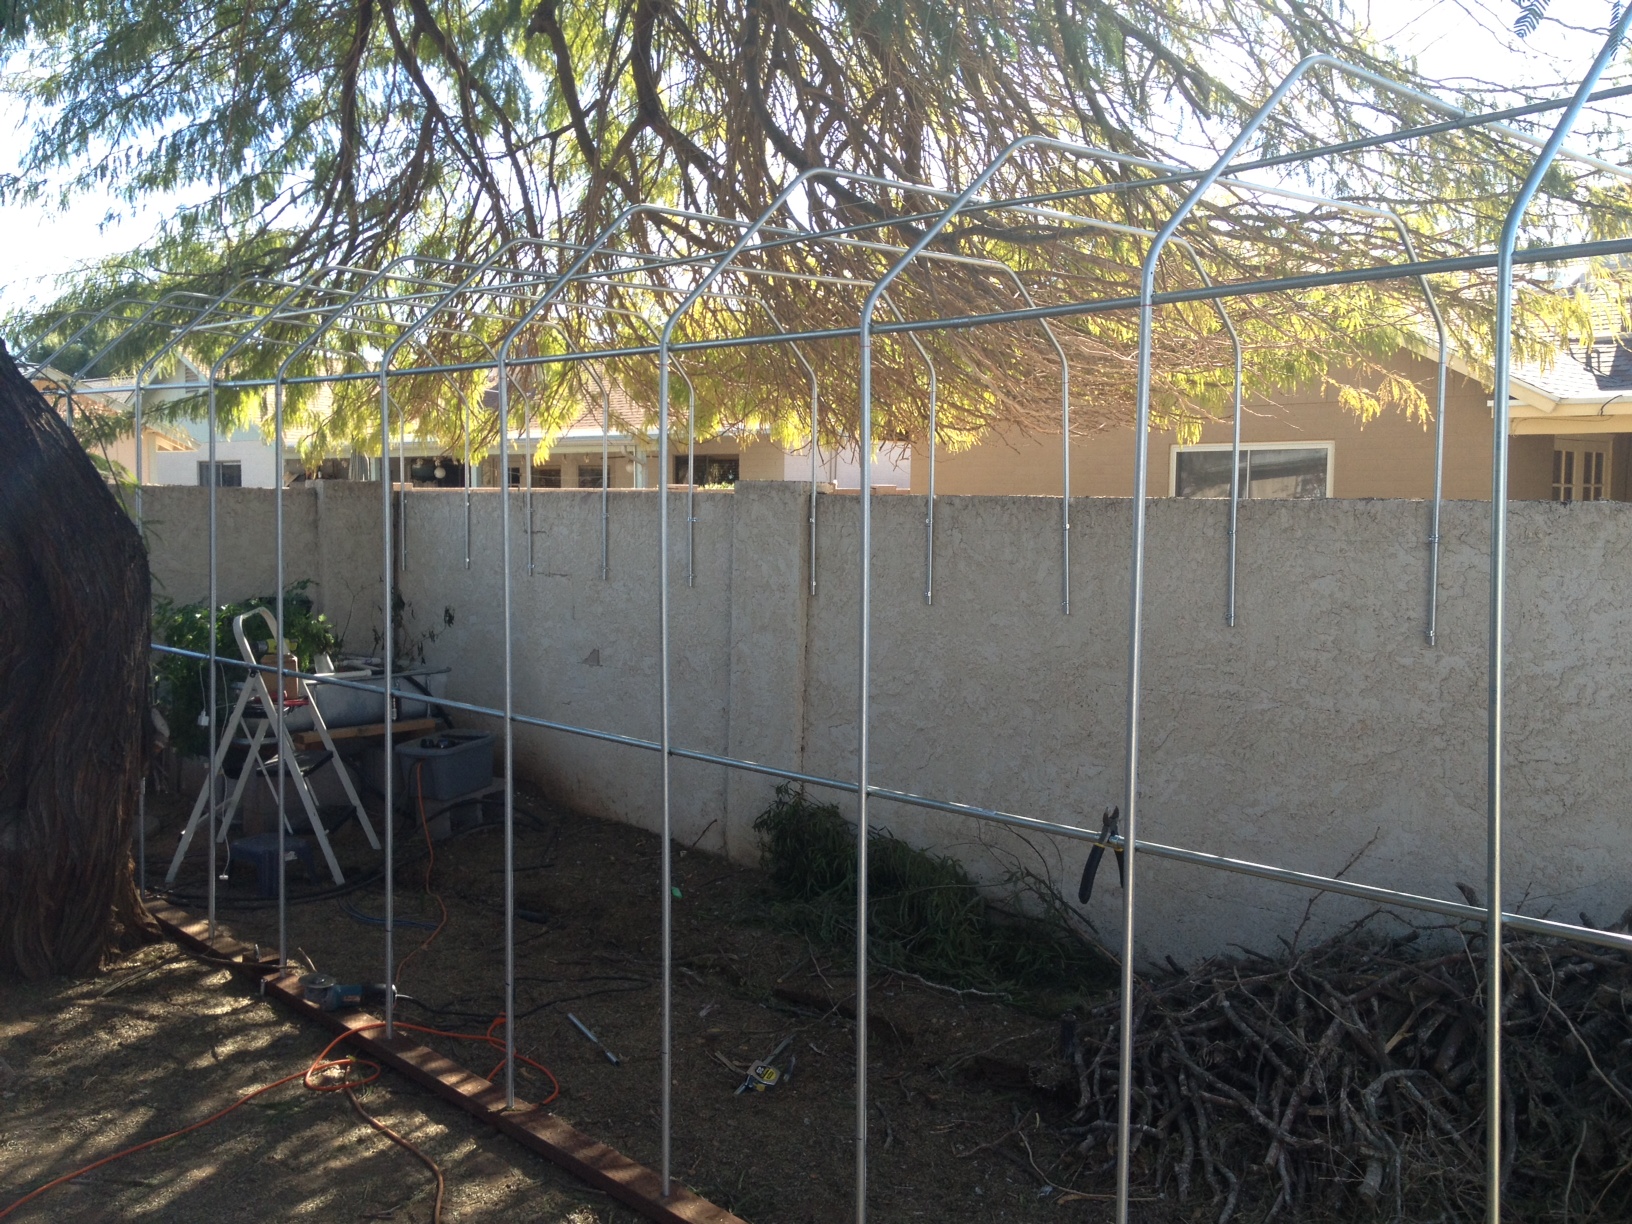 This is a 80″ by 30′ section.
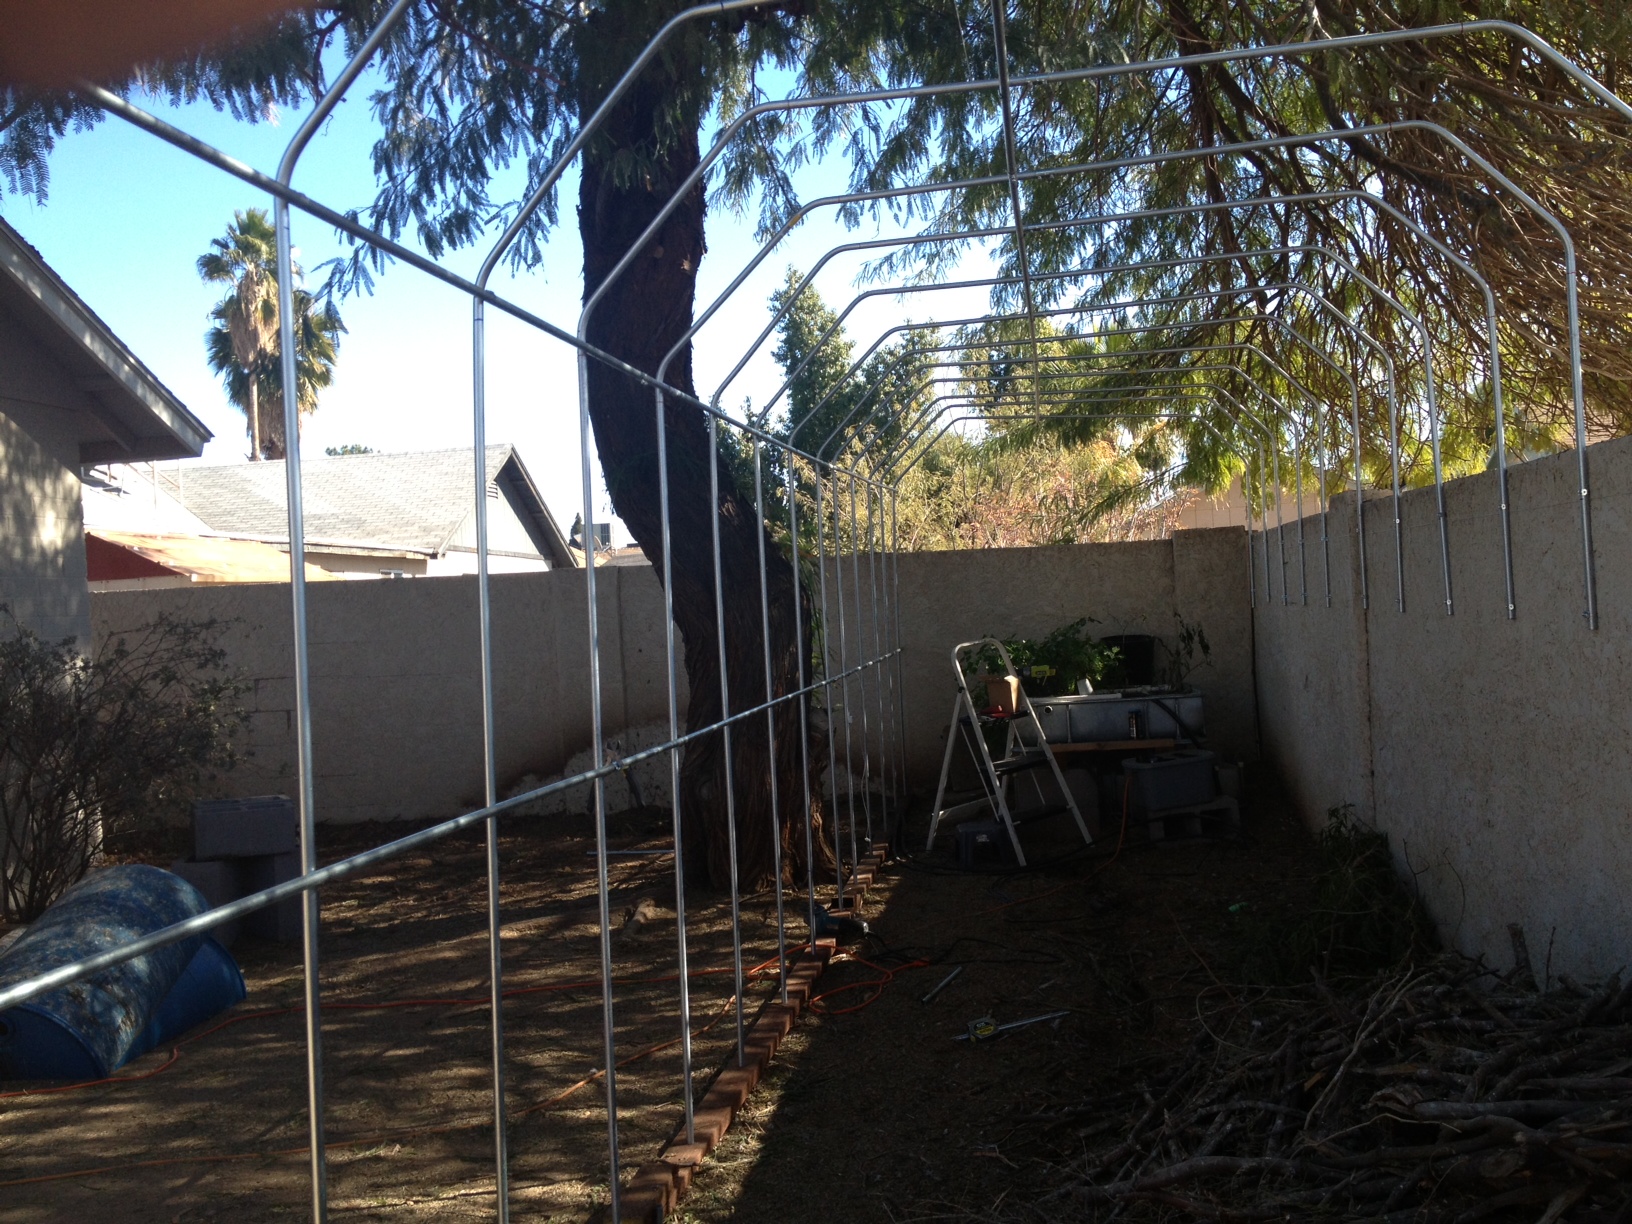 We used 42 EMT 1/2″ conduit pipes to build the framework, 15 wall connectors and 15 female to female pipe connectors. The ends used a treated 4×4. Total cost in parts was about $120, but I paid someone $150 to put it together, so $270. The shade cloth is about $50, and the clear tarp for the winter was about $80. A small 8’x10′ greenhouse from harbor freight is almost $750 so this is a good savings I think, and much more versatile.
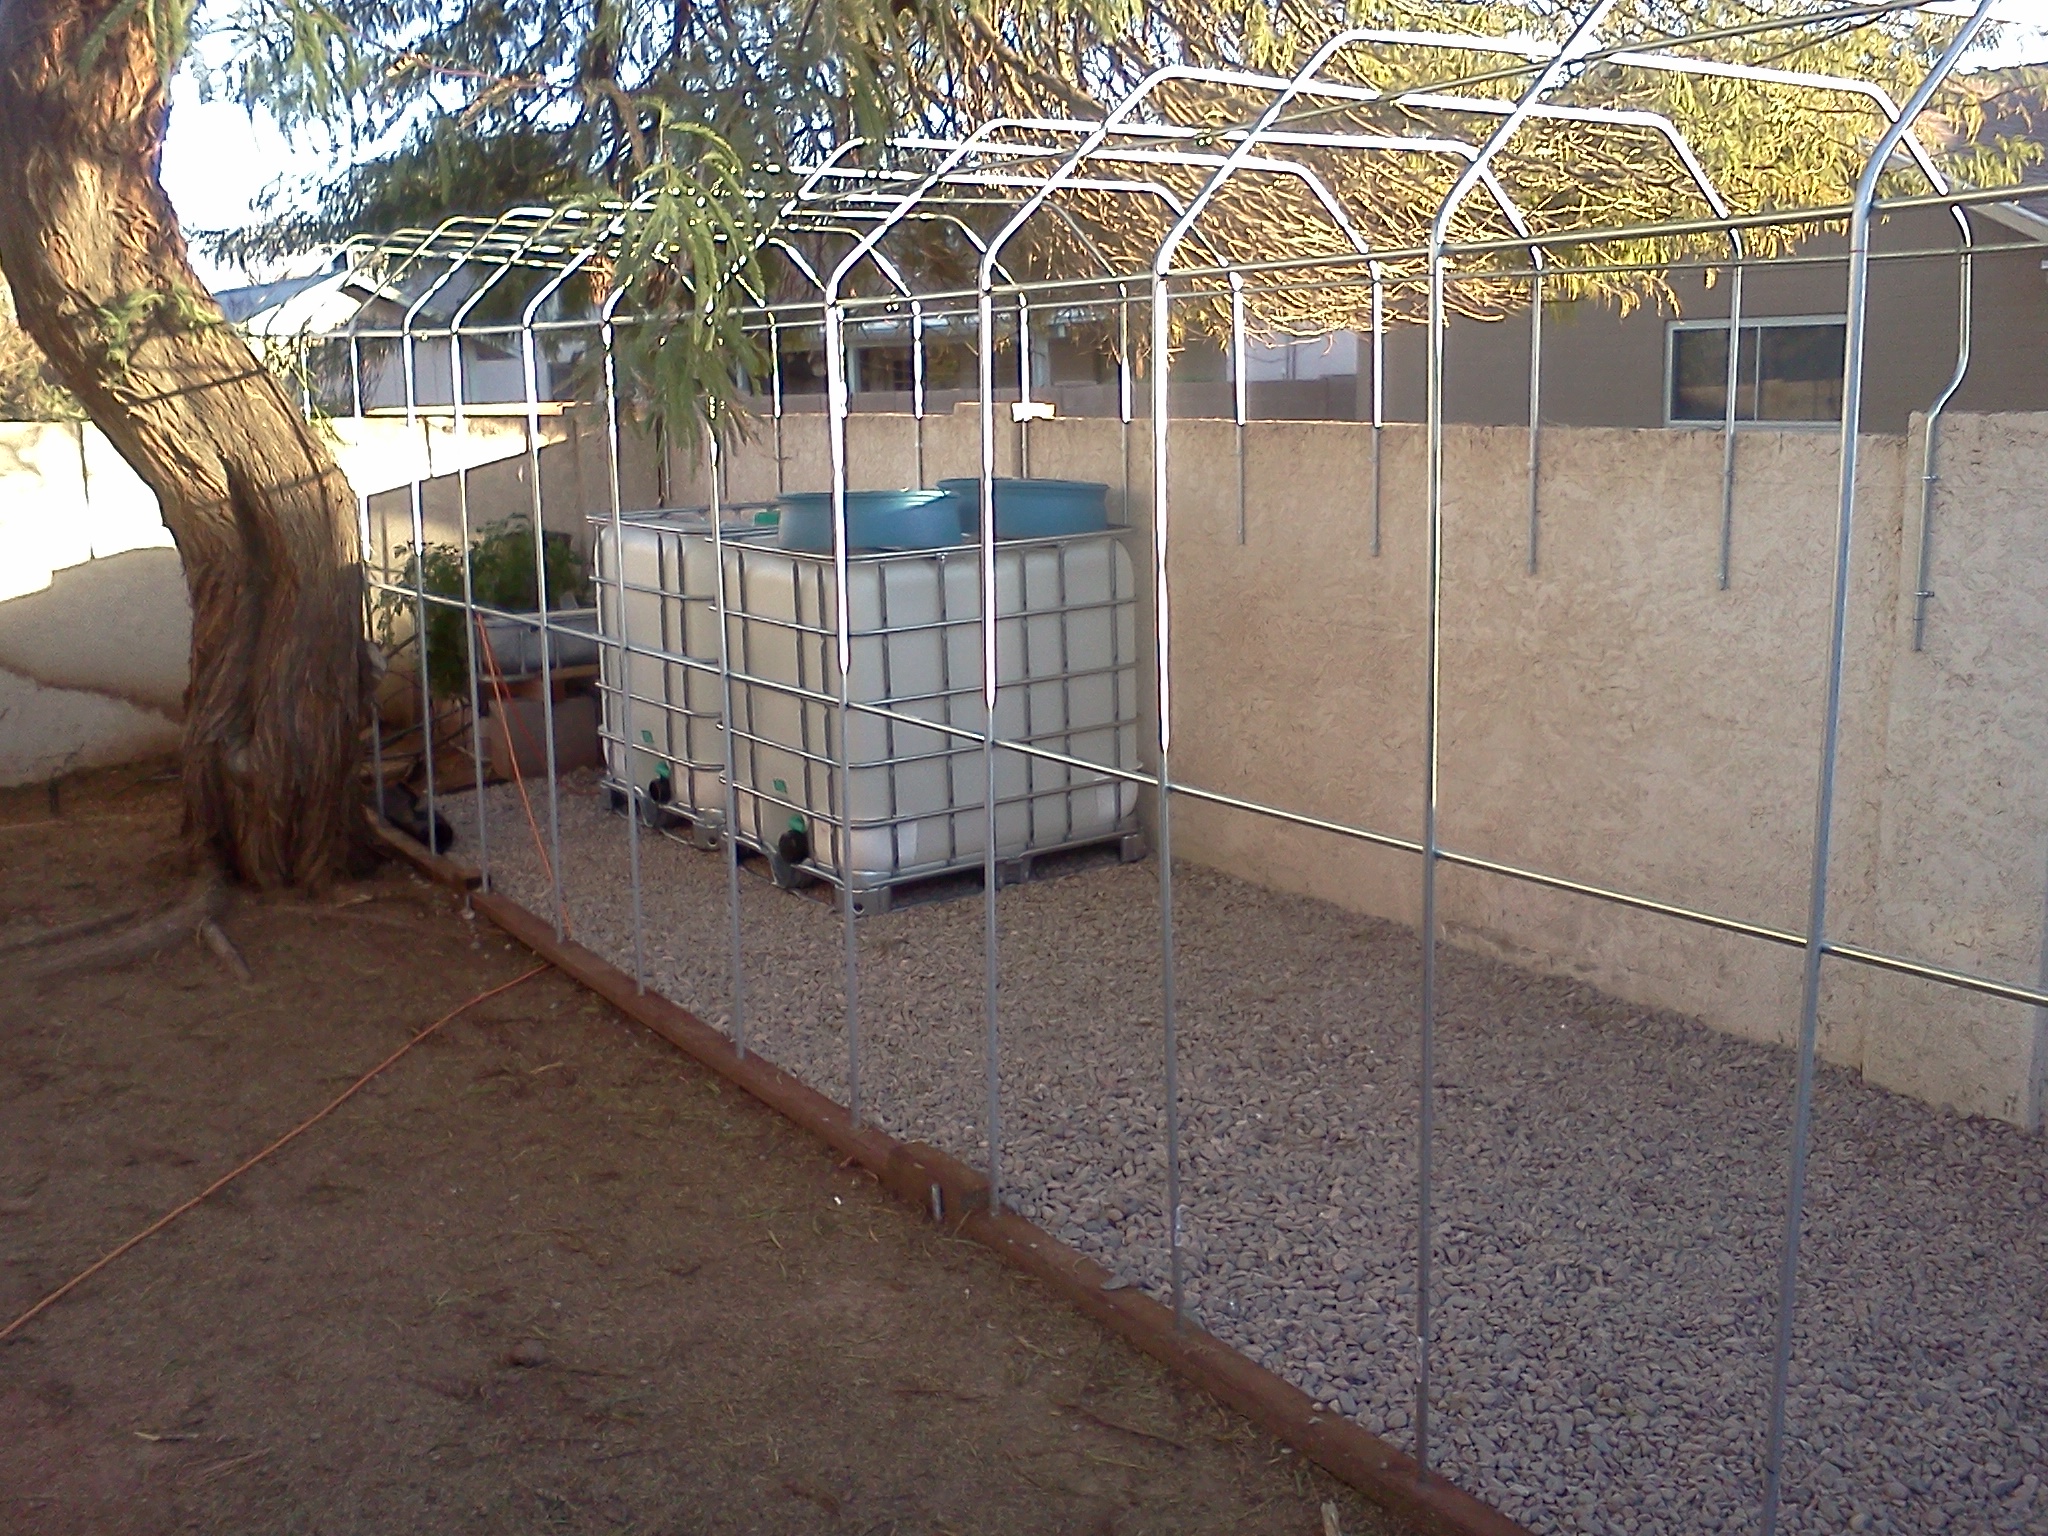 The river rock is left over and costs about $32 a ton. The pest guy happened to spray this part of my pile of river rock, so it became flooring instead. I have several more tons, but it still irritated me. You can see where the two IBC tanks will go. The current IBC will become a sump.
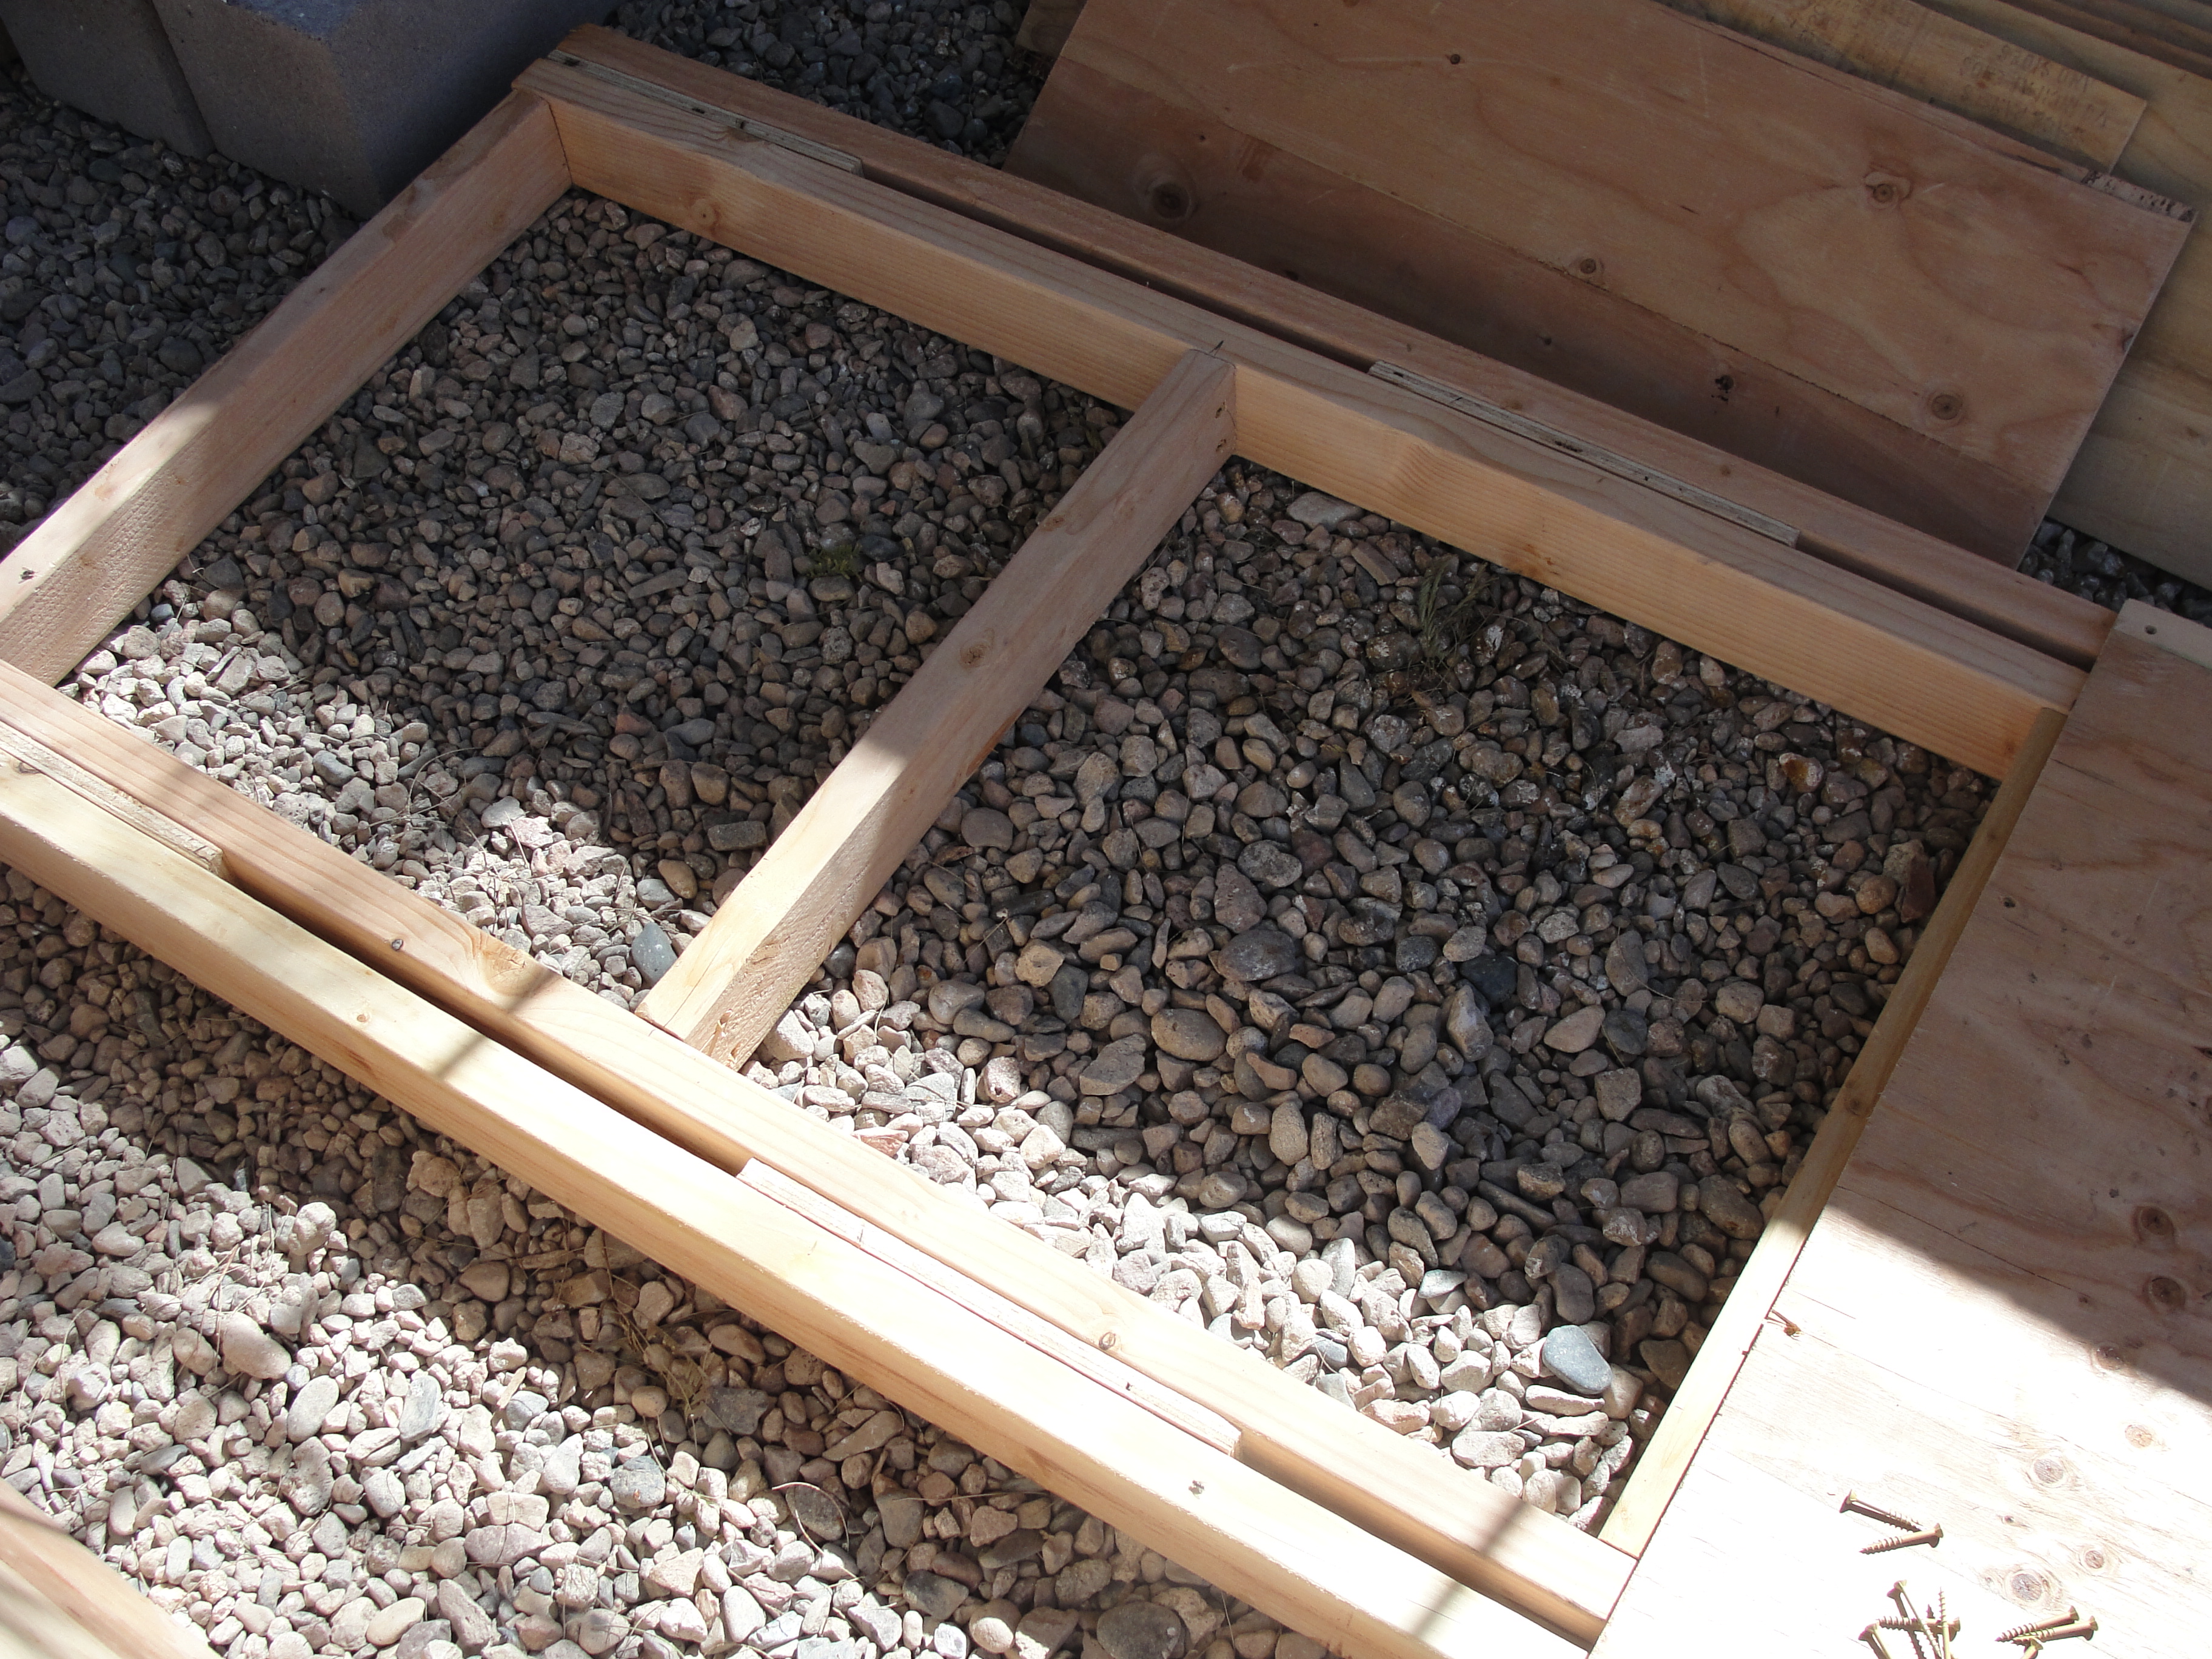 We used some of the plywood trimmings to make spacers. 2″x4″ @12′ are much cheaper than buying 12′ 4x4s I feel confident this can hold the weight of the grow beds. I might of been better to put the cross braces 16″ instead of 24″, we’ll see. I messed up a bit though and did things out of order. It would of been better to put the cross braces in first, then the spacers and second 2×4. We had to toenail them in instead of come in through the ends.
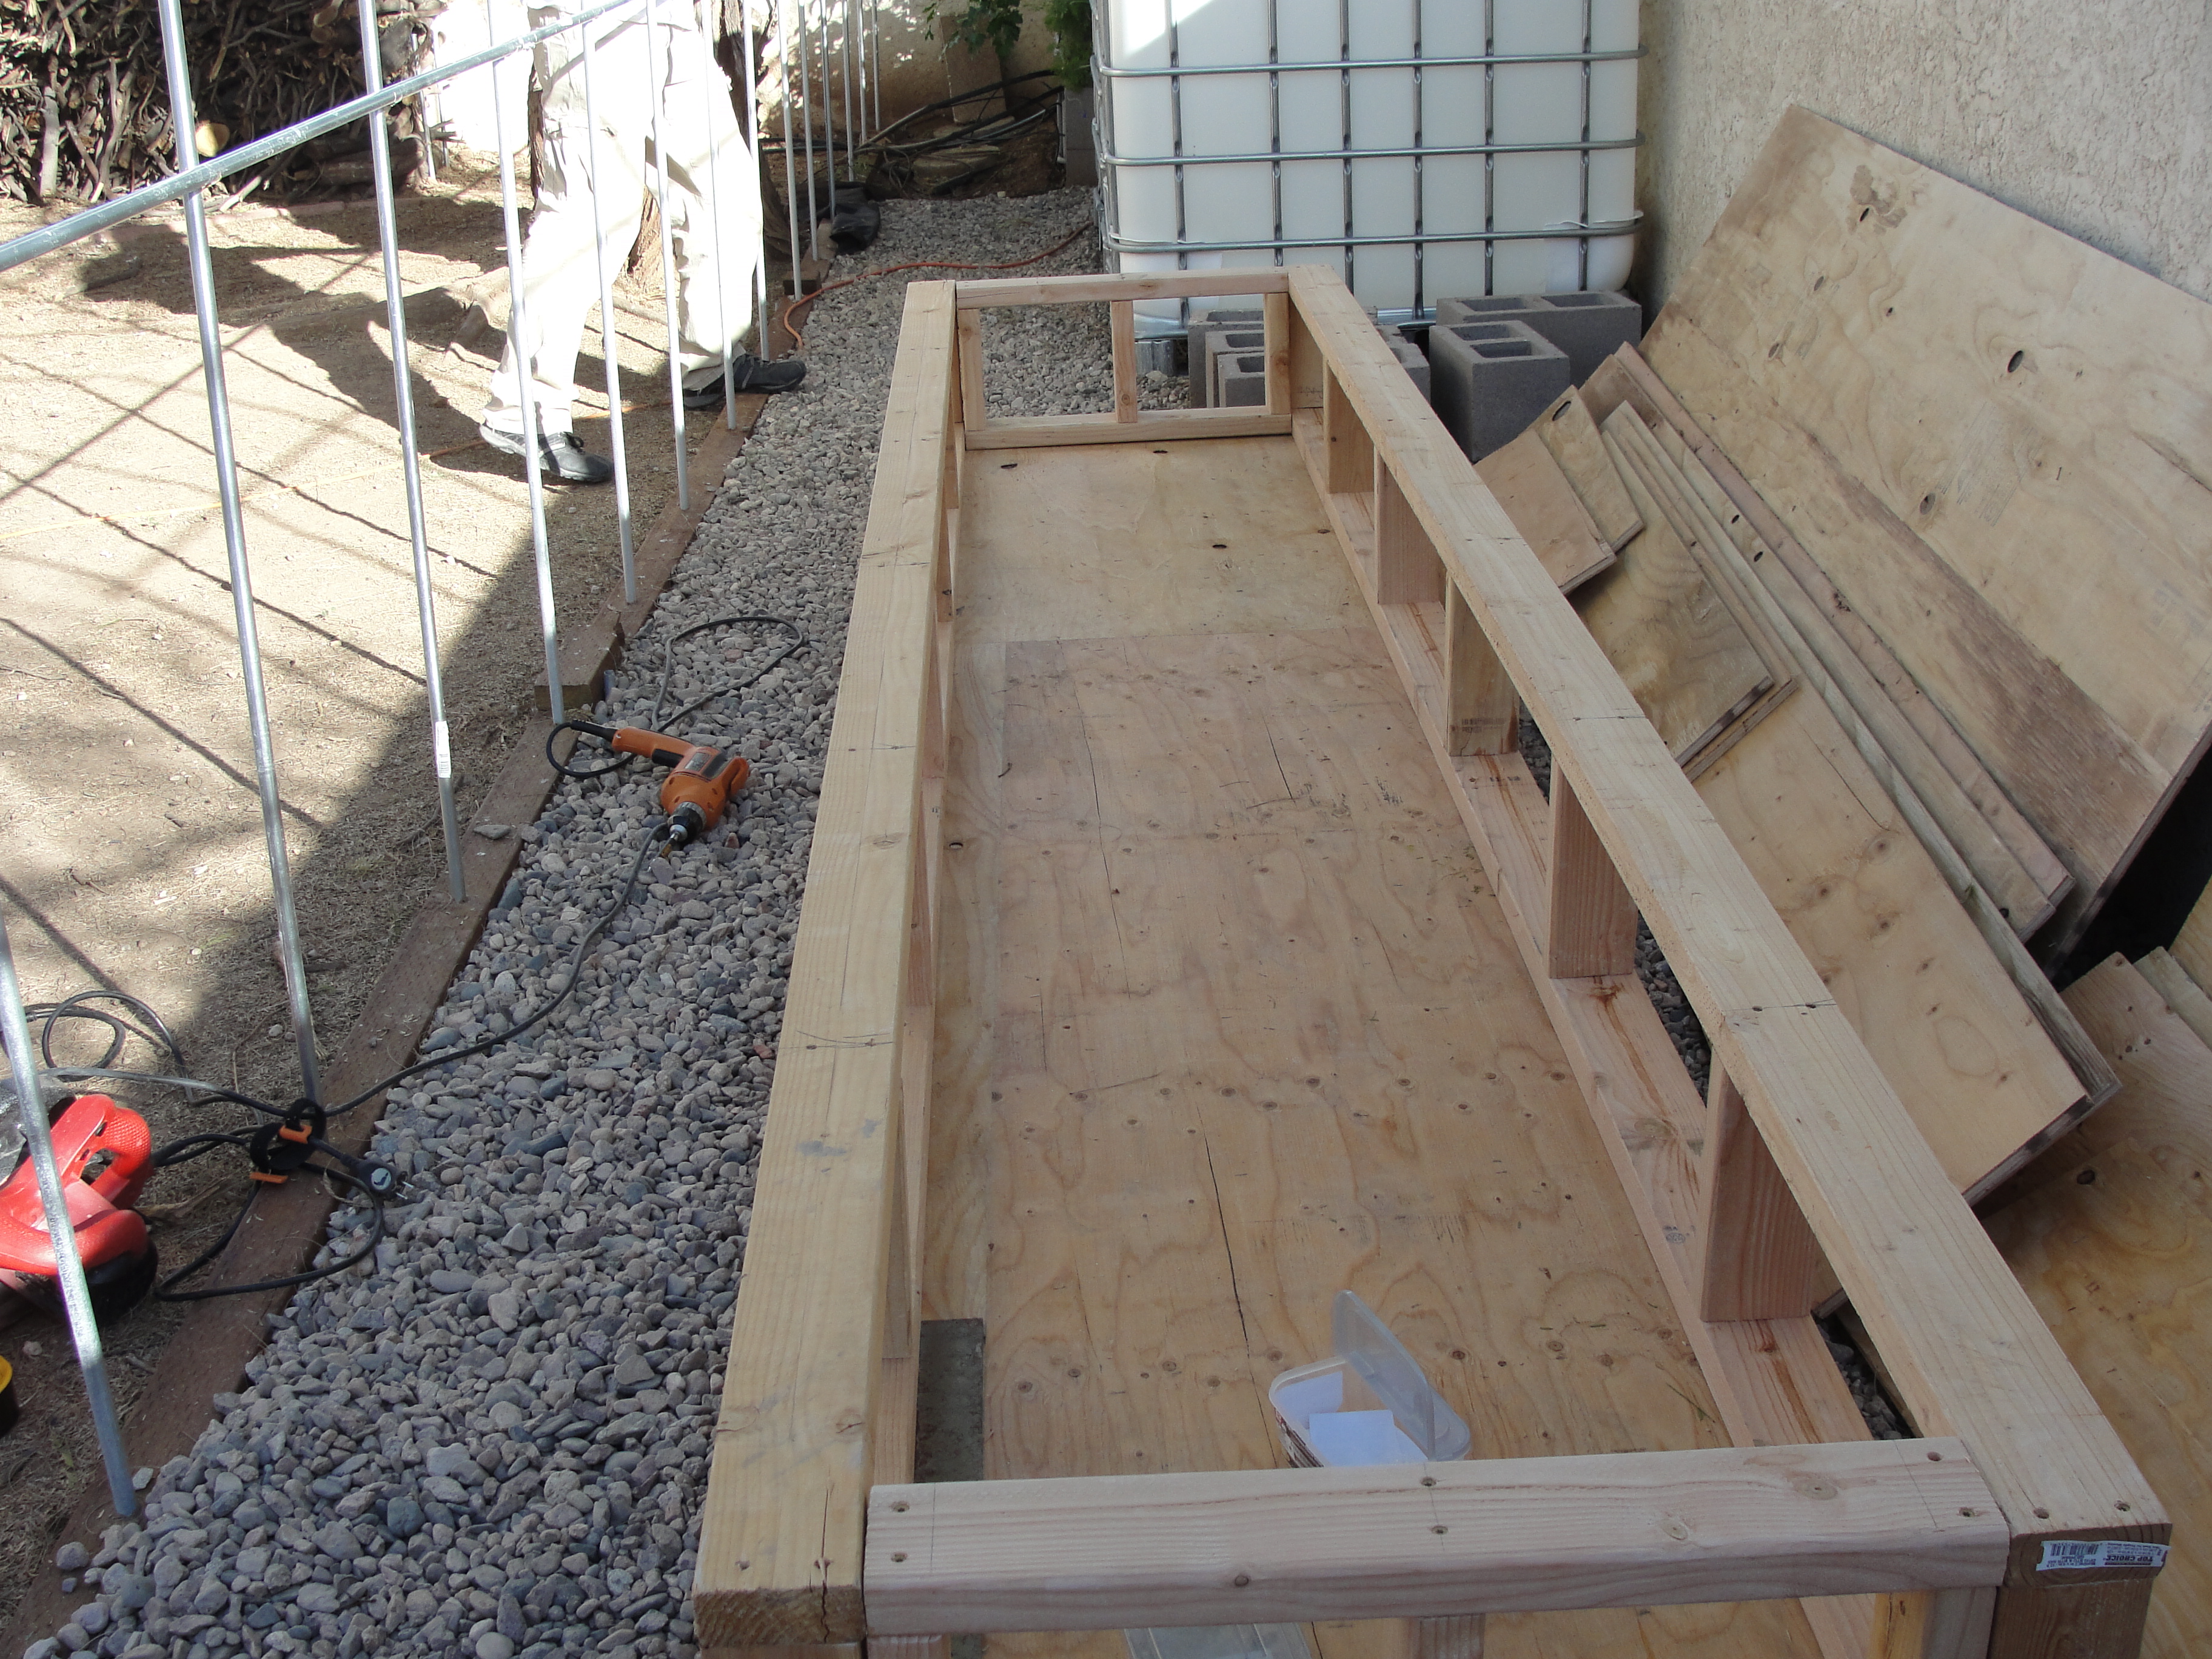 We put the 5/8 plywood down (again maybe 3/4 is needed?), then we built the side walls. I could of saved some money by getting scraps and cut offs from lowes/home depot, but I didn’t think of that until too late. Also, I could of saved a few dollars by using 92″ studs instead of 96″ as the cuts worked out to waste 4″. Each of the pieces is 9″, so it would of fit perfection to cut 10 of them out of a 92″ stud.
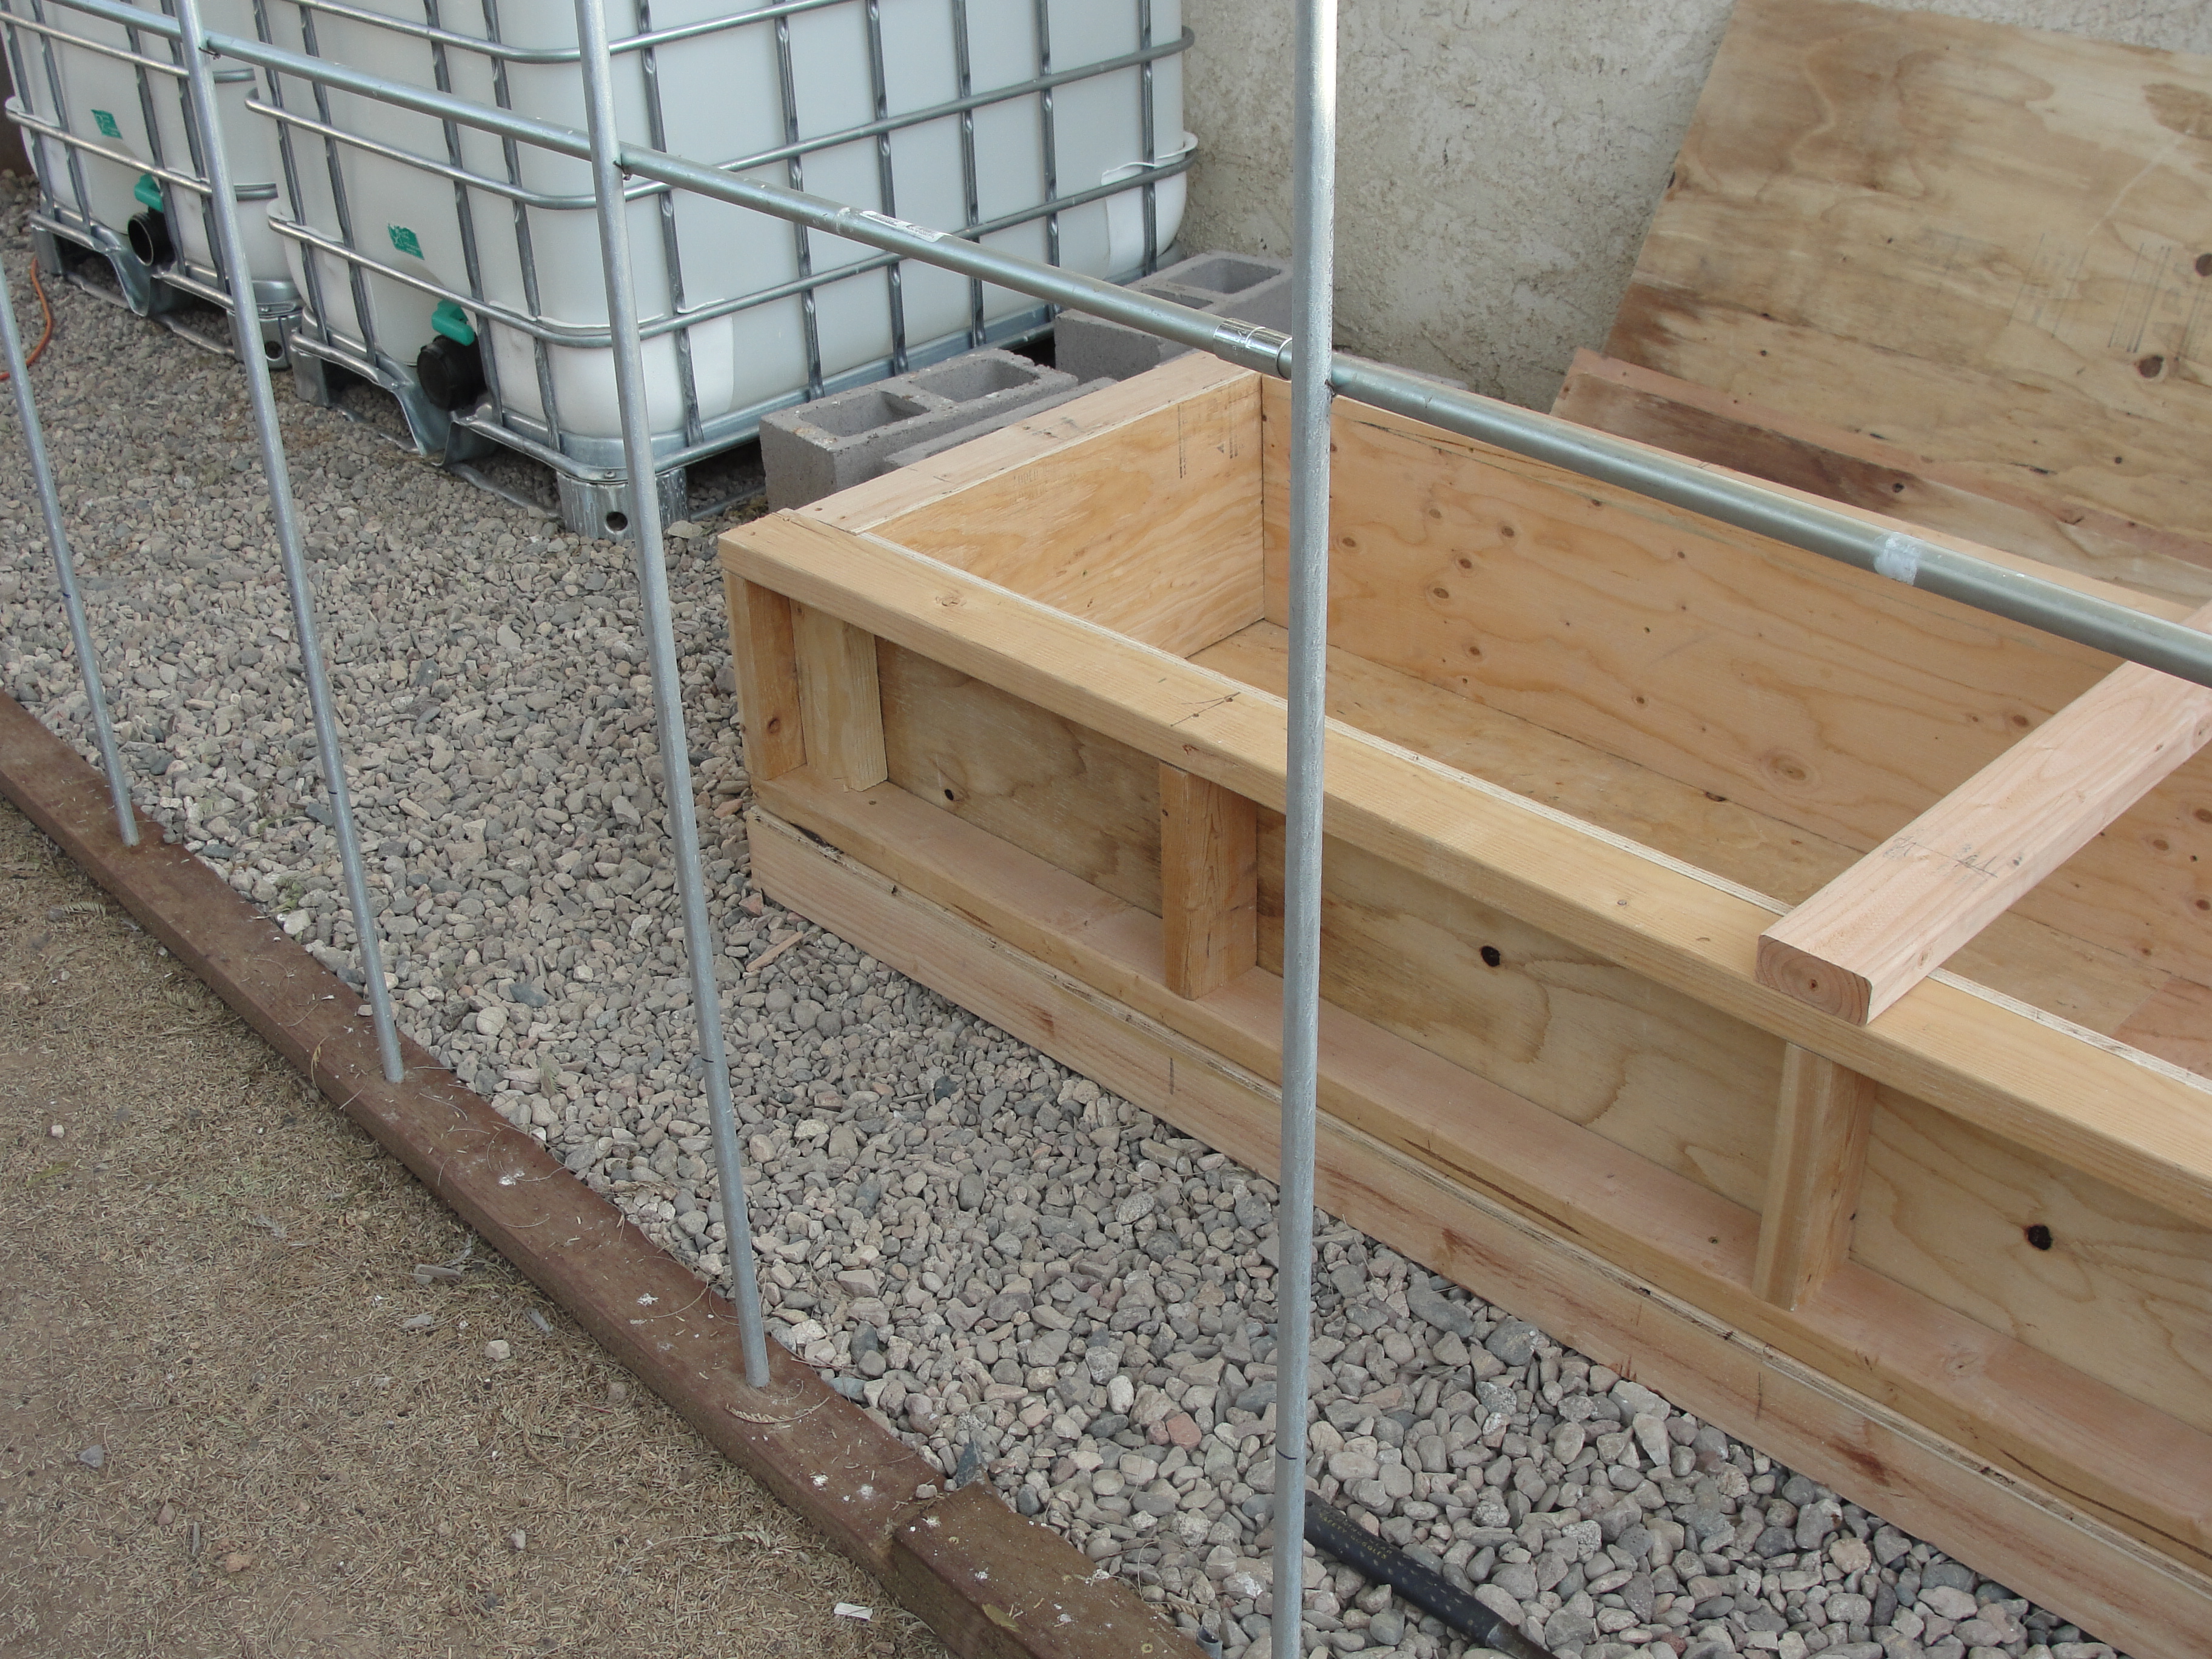
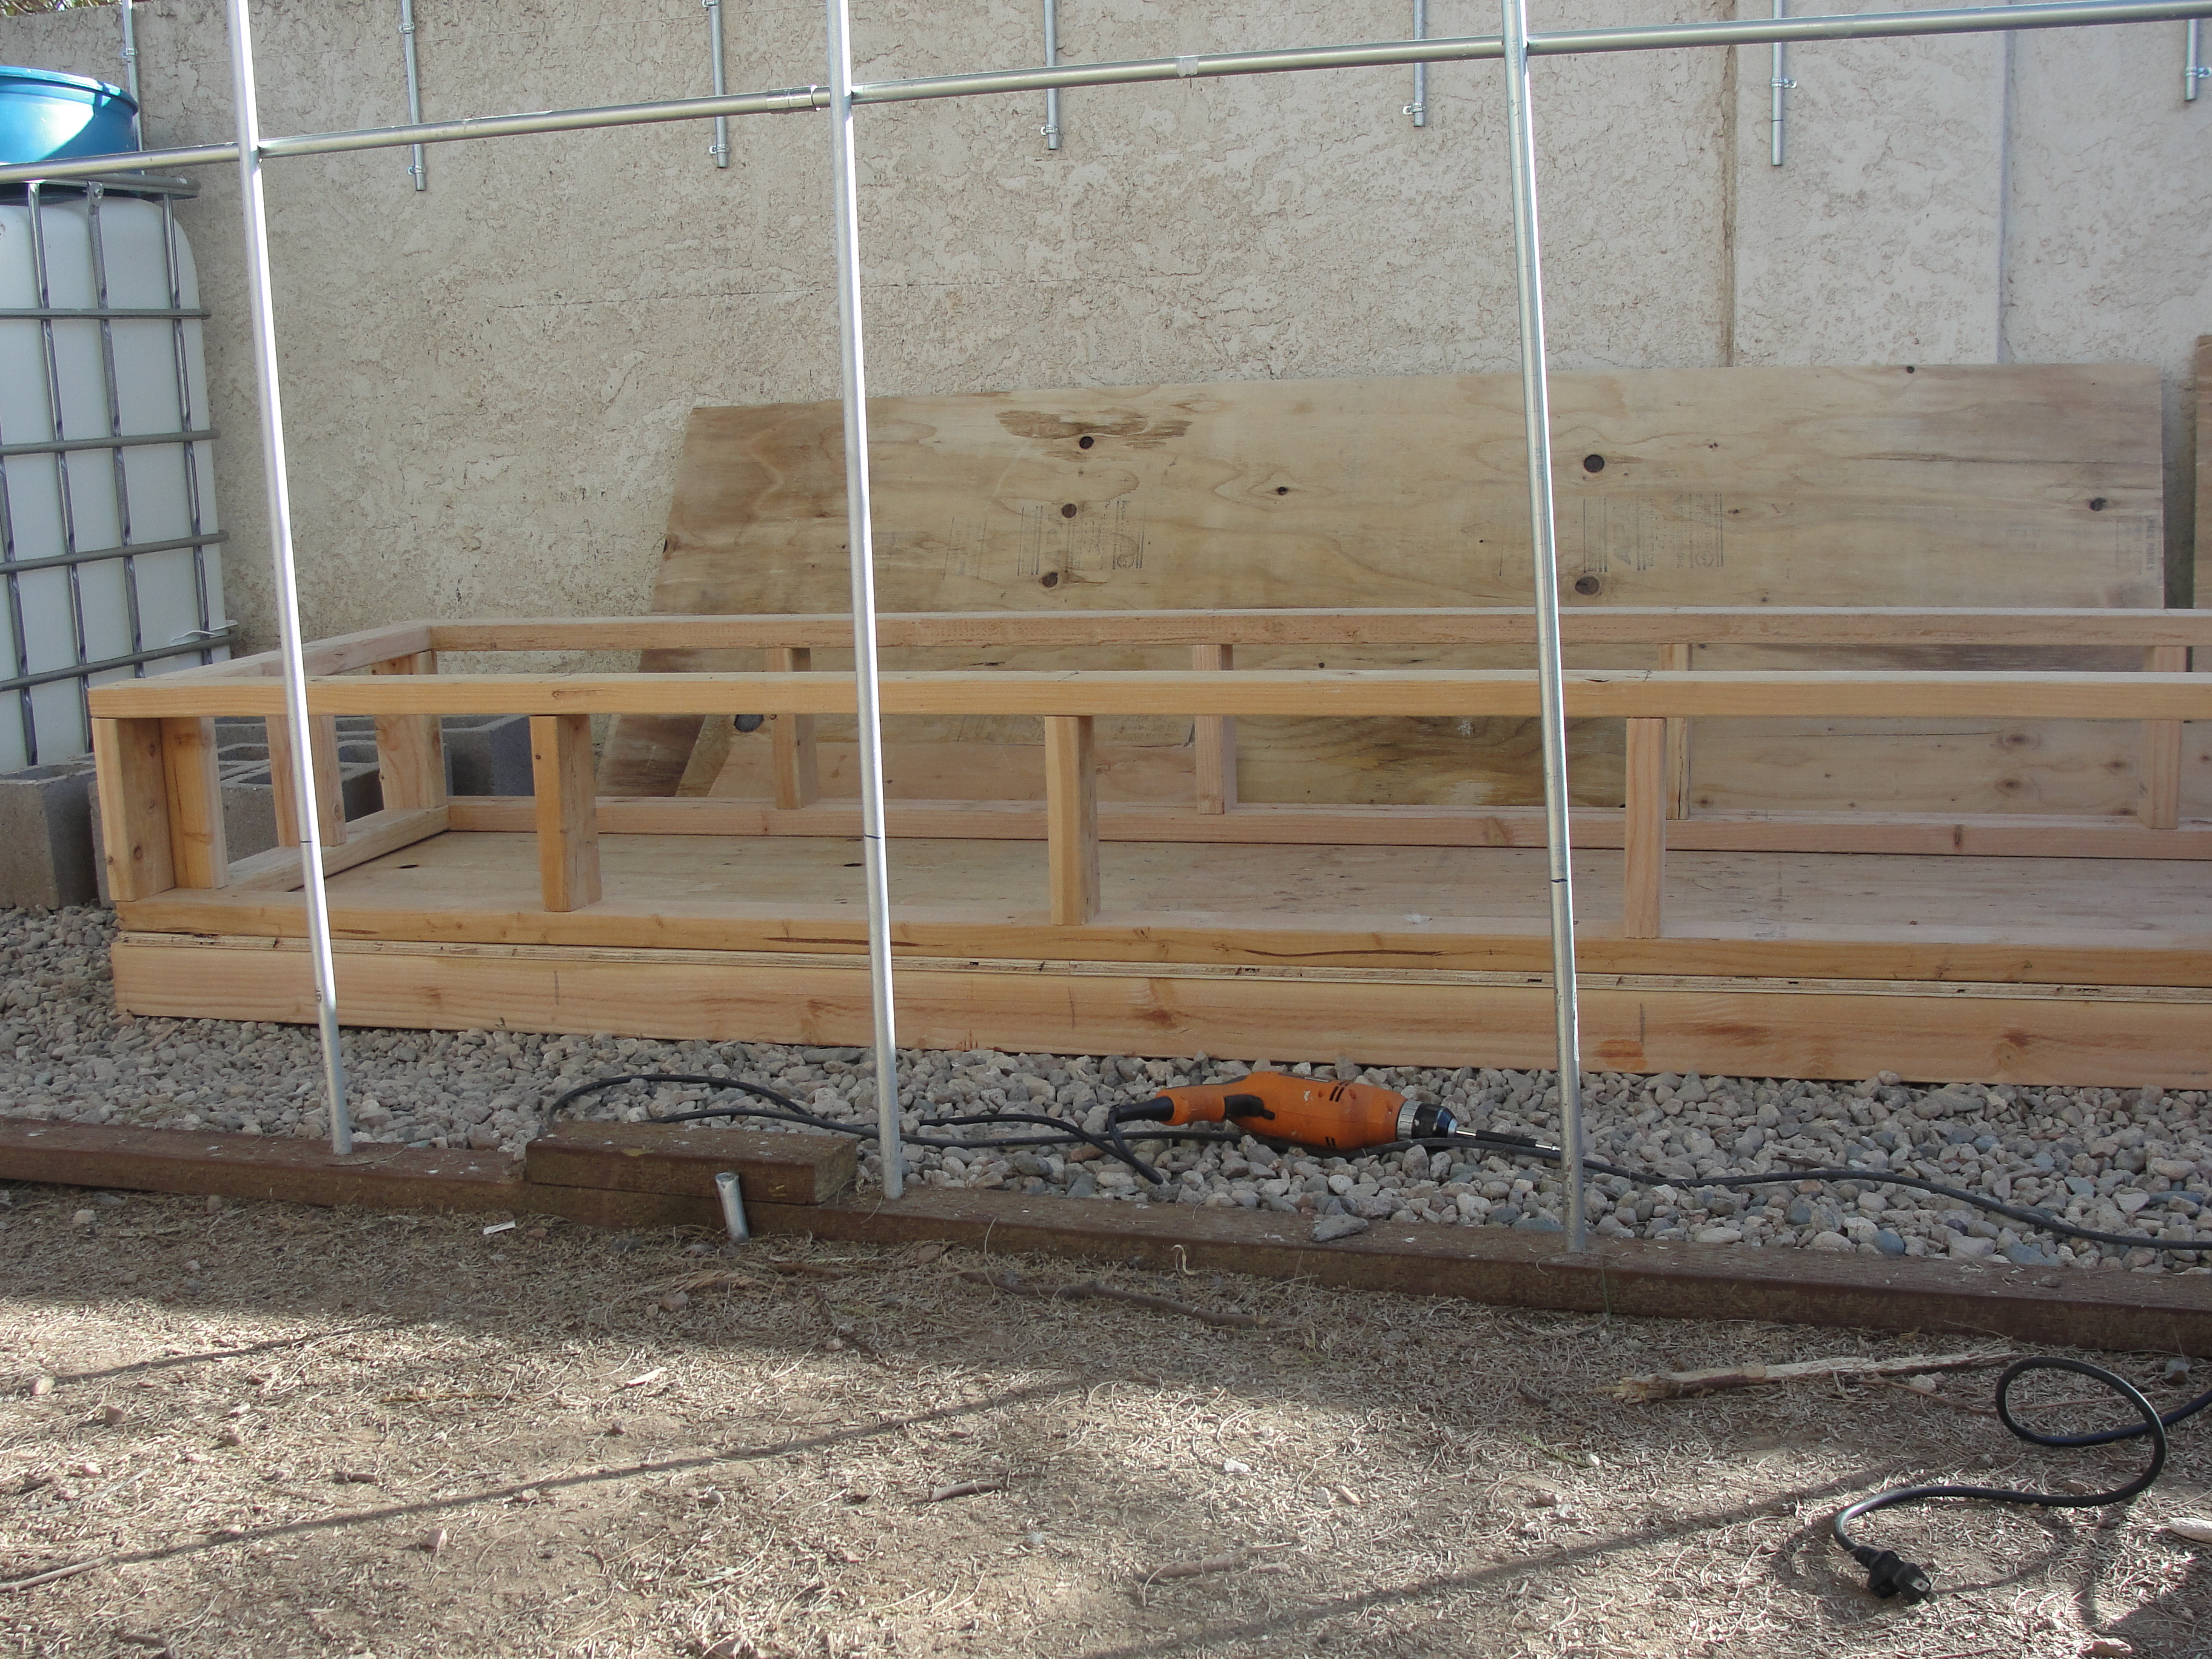 Side view of the grow bed.
 Justin asked me if he could dig a hole when I told him I was going to hire someone to do it. He got about half way down into the clay but his hands got blisters (through the gloves), so I made him stop. He helped me with all of the other assembly, measuring, cutting, etc. We had fun, I think lol.
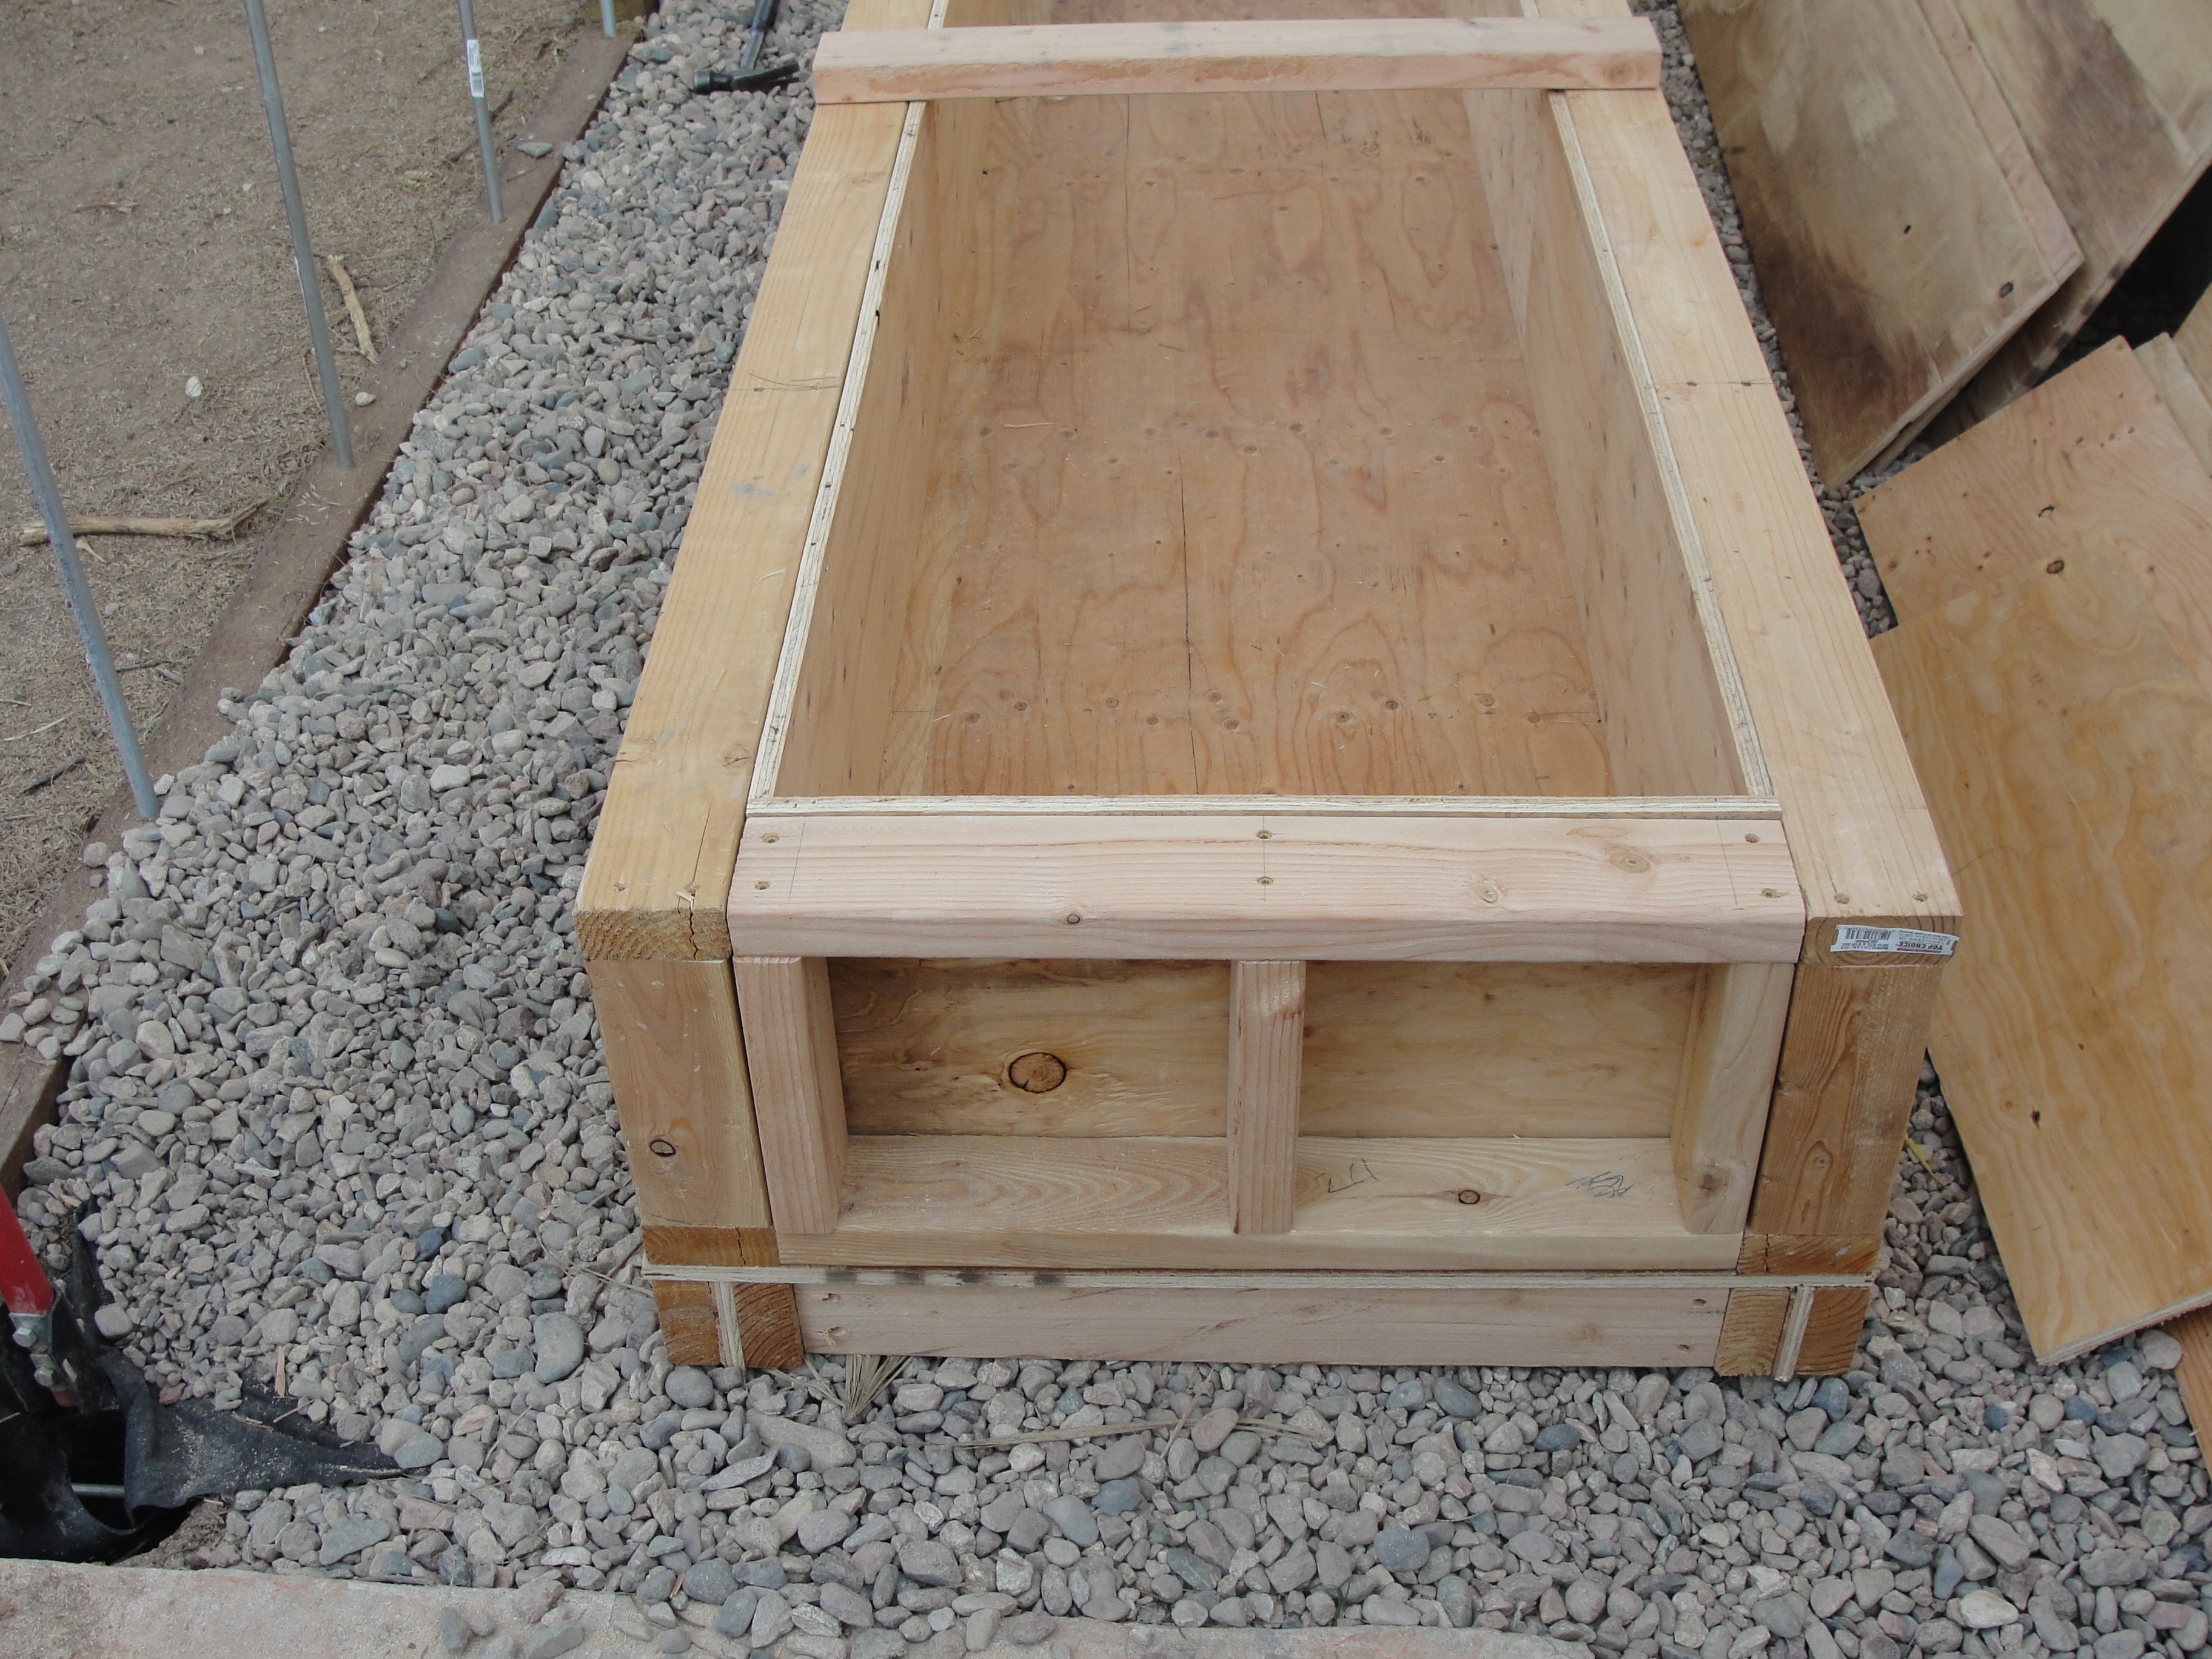
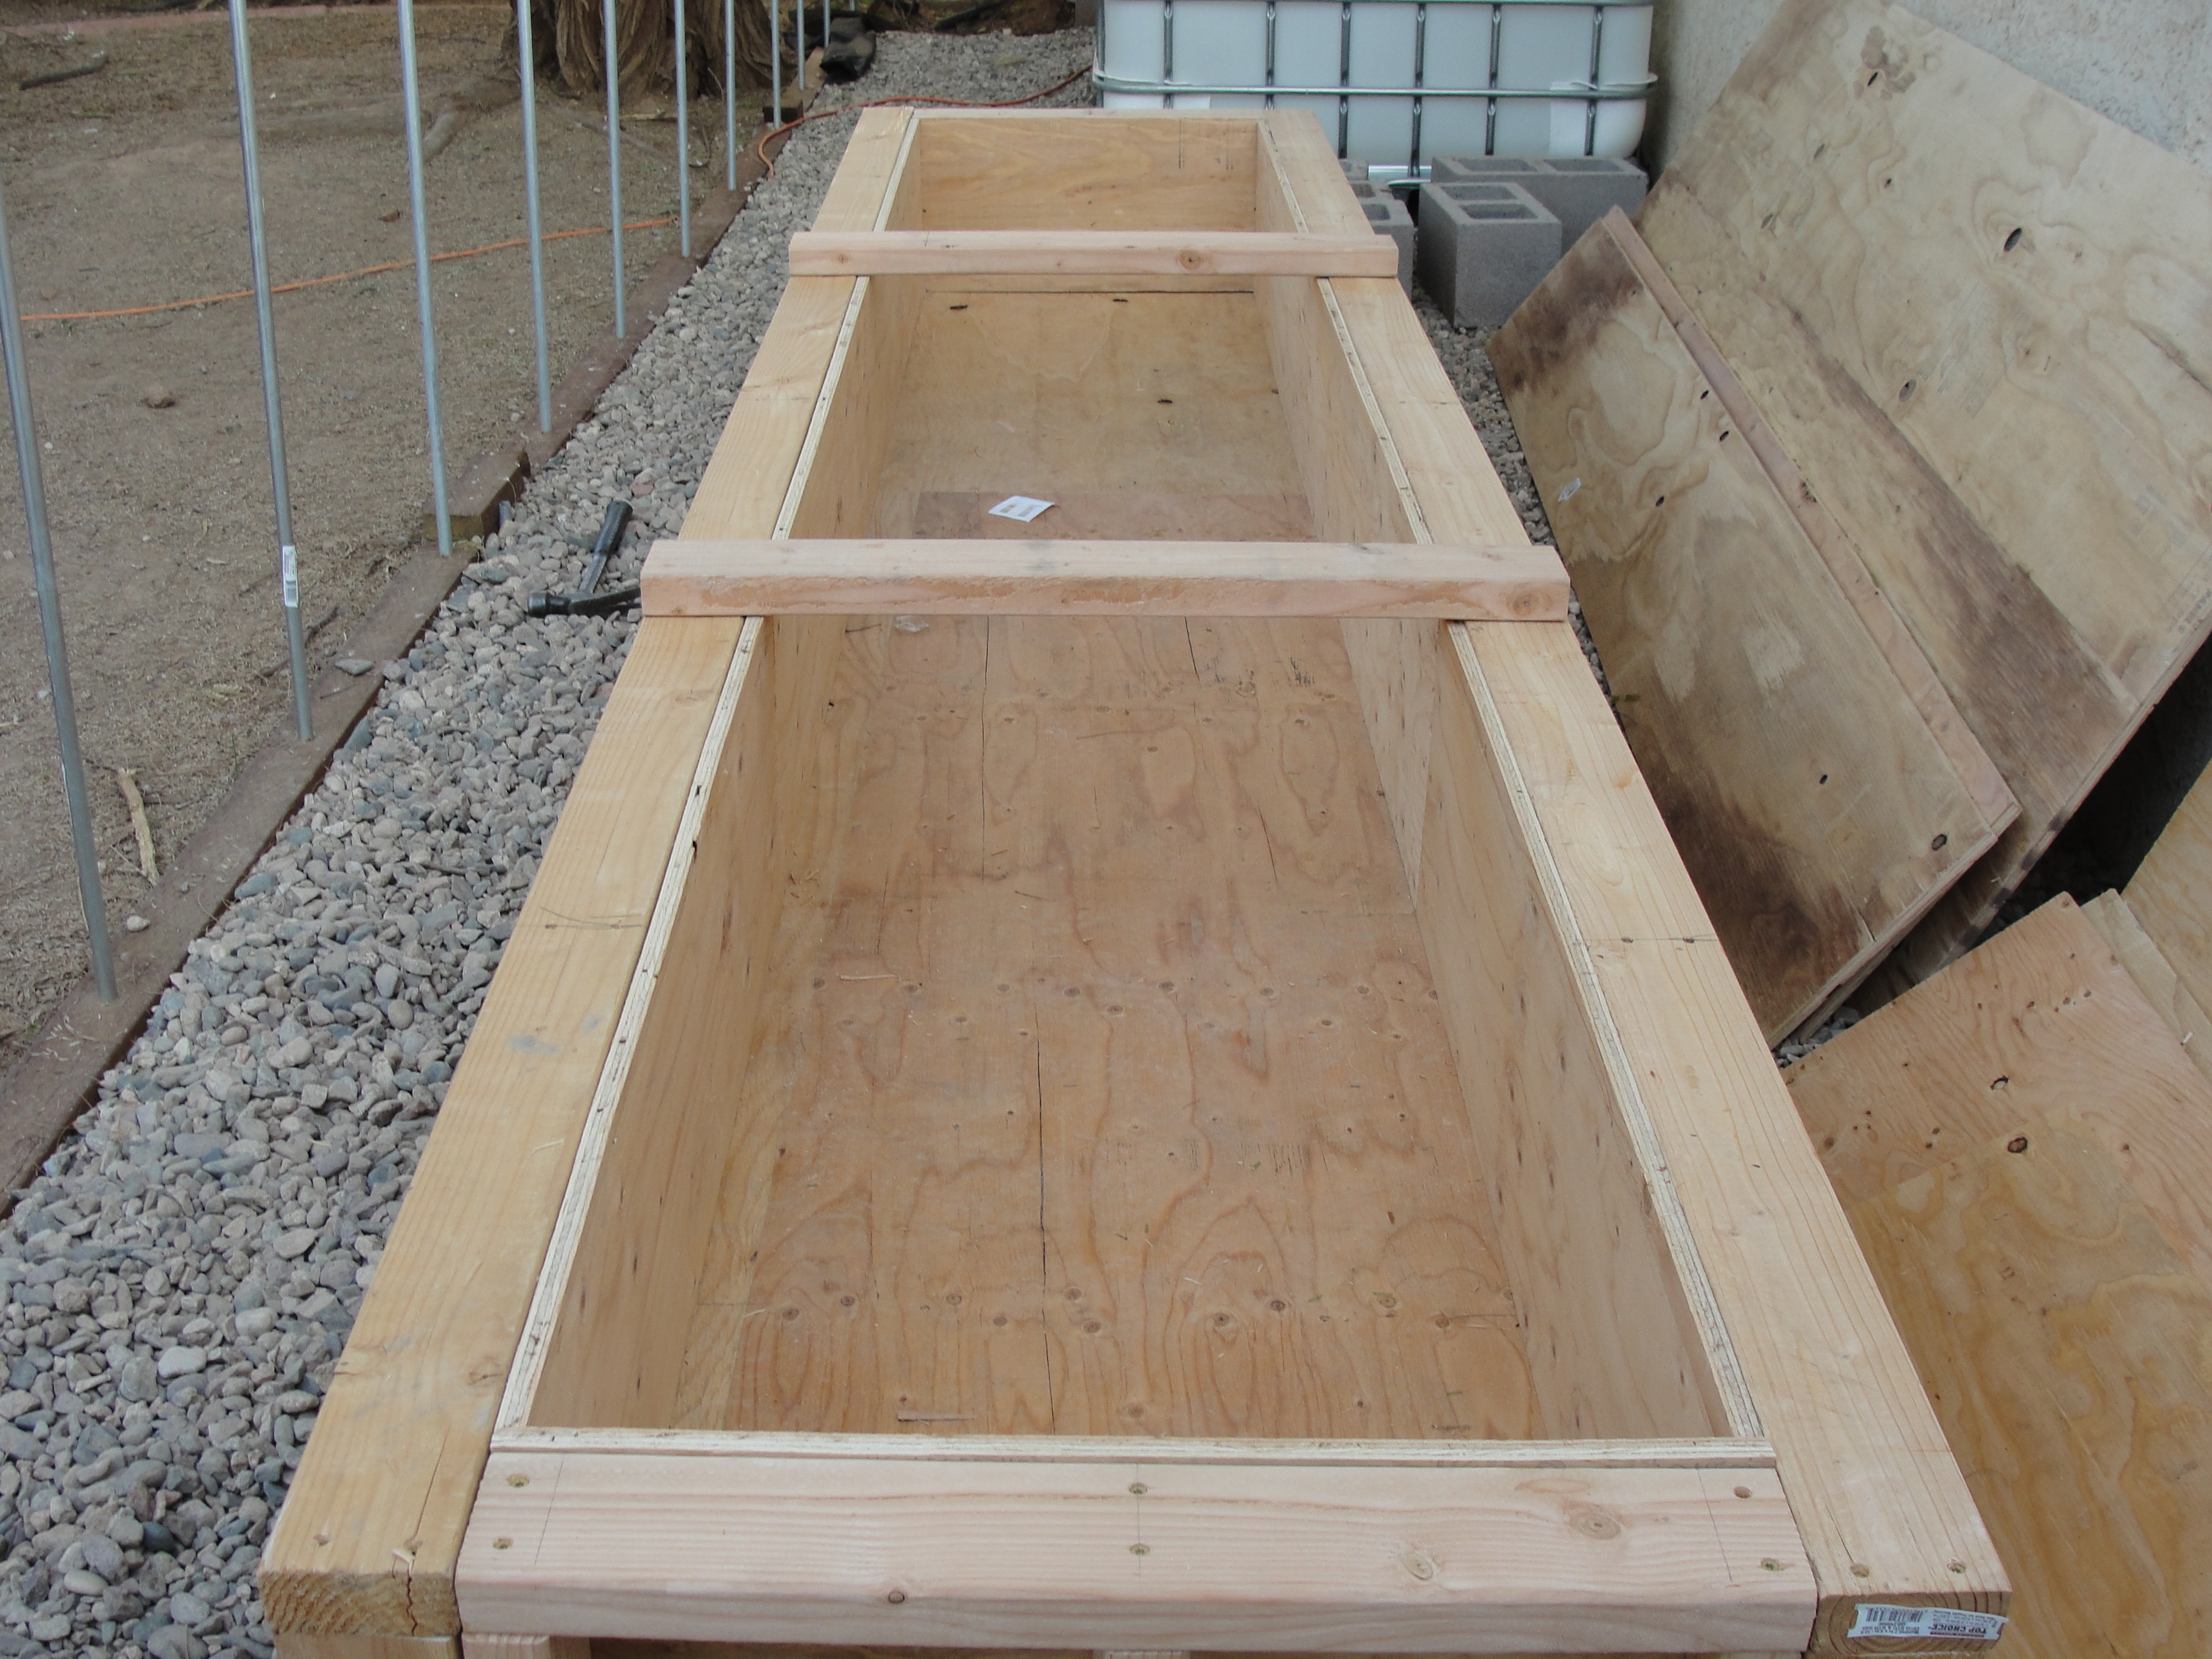 Finished grow bed, before it is placed on the 4×4 posts. The posts will go every 2 feet and raise the grow bed about 28″ off of the ground. The 2x4s on top are to keep the sides from flexing outwards from the weight of the grow media and water.
 It took about a day to measure, cut, assemble 1 complete grow bed, and measure and cut the parts for the other grow bed. I think it will take about 4 hours or so to assemble it, but I’ll save that for next week.
Sweet setup! I would caution against warm blooded animal waste in a closed loop aquaponics setup. Fish are cold blooded and there are very little diseases that can be transmitted from fish to human… this is not the case with chickens and rabbits.
I agree. I will need to be cautious about e coli and the like. I have taken that into account. In reality, all of our vegetables should be washed and cleaned before eating anyway. For now it’s a thought. I don’t have chickens or rabbits yet, but I do want them.
I’m wondering if you couldn’t use a vermicomposting (worm farming) of the chickin/rabbit waste as an intermediate step to break up the parasite cycle for e-coli, etc. The worms then enter your system as fish food, and the compost can be used in a regular garden, hanging/potted plants, or traded to dirt-gardeners in exchange for something useful (plants, veggies you don’t grow, fresh pullits or bunnies,etc.).
About rabbits. Toured a local organic farm. They have several rabbits in cages raised about 3′ off a concrete floor. They put the bunny balls in a 55g drum to make tea. They built a solar panel with a recirculating pump (plastic tube on a plywood panel with glass cover) that heats the resulting tea for several days (a certified organic requirement in FL). That kills the bacteria and they can then safely add the tea to their drip irrigation water. It is their main source of fertilizer.
@larry – that’s a great idea. Killing the bad bacteria by cooking it would work great, and using solar is brilliant.
I love your idea and your diagram, though the rabbits and chickens would not fare well in the non AC green house during warm periods. You would need to design a separate structure with more air flow to prevent heat stroke and disease. Your second structure can have a permeable floor with a constantly flowing stream to transport fecal matter back into the system.
I ended up not putting rabbits in and not even using their waste. As others have pointed out – the E. Coli danger is too great without cooking the bacteria first.
I ended up not putting rabbits in and not even using their waste. As others have pointed out – the E. Coli danger is too great without cooking the bacteria first. I learned that rabbits like it much cooler – 60F or even colder if you are breeding for skins too.
I love this setup and would like to see more pics of it completed. Amazing job.
I am just getting into studying aquaponics and your system looks great. Just a thought on keeping the water temp under control during the summer. Someone else stated that he had frozen large soft drink bottles in a freezer and simply dropped them into the fish tank during the hot part of the day them removed them in the evening and refroze them.
@Donald that is a great, simple idea.
One other idea would be to use the soil/earth to cool the water. Usually the ground does not heat up in summer so you could place a coil of pipes in the ground that cool down the water in summer. In cold areas this can also be used to warm up water in Winter. This can also be done with air btw. so you can use the ground as a low-cost airconditioner to cool down the air in a greenhouse – or warm up incoming air in the winter.
For cooling water without the need either to dig up the entire surroundig or to drill holes up to 150feet deep, a coaxial heat exchanger could be used, It would be interesting if this could be done the DIY-way, e.g. by raming a pipe with a closed pointed tip into the ground and then let the water run down with a garden hose and come up through the pipe around the outside of the garden hose.
Else – for inspiration: http://www.rehau.com/international-en/building-solutions/renewable-energy/ground-source-energy/raugeo-coaxial-geothermal-probe
I think energy-efficiency will become a crtical factor in the future and keeping the water temperature at level is energy consuming both in hot als in cold areas.
any plant can grow to maturity on fish emulsion (fish poop)
chicken menure is best left to the dirt garden
for some good reading
http://skippysstuff.com/biofiltr.htm
the hardest thing to do is start
and you have that whipped
another thing to raise is (worms ) it will give you good compost from kitchen scraps for your dirt garden
and guess what fish like to eat
the other thing is are you planing on Tilapia
if not trout like the water a little cooler but they take a little longer to maturity
best of luck
@don – thanks, and that’s a neat filter for ponds. My first thought about aquaponics was to convert a stone look jacuzzi into a waterfall and use that as the fish tank for some grow beds that I had out of site around the corner. An idea like your filter would of allowed me to do that if I continued. Thank you for sharing your design.
Dear Sir,
My partner Gary Stern and I have been planning and researching for 2 years on Aquaponics.
We have a site already built in Tucker. We have recently contacted a serious investor.
This is going to be a commercial farm called Rise Above Poverty RAP Farms.
I want to thank you for the great information that you have freely given here.
I have asked a lot of people for assistance and as you know this generation is so worried about their own and not sharing as King Jesus told us to, they refuse any assistance.
We are currently located in Stone Mountain, GA.
I was very encouraged about your projections on the size of the tanks and beds.
With your information we will be able to enlarge the system sizes considerable.
When you discuss the sand filtering is this instead of the bio filter?
I want to install a 10 gpm pump directly after the fish tank to insure max flow. What do you think?
Please call me anytime to discuss.
Bro Richard 678-927-0395
Brother Richard – I’m glad my information has helped, but I caution you about using this information for commercial systems. My information is geared towards feeding a handful of people at a time in small backyard systems. I do not have experience in large commercial systems over 1000 gallons and am unaware of specific challenges those systems might have.
Sand filters chops up large chunks of solid into finer particles so they can be further digested by bacteria. The bio filter is a better system that does the same thing.
I think that designing a system around one pump is better because it’s simpler. Make sure you have a power backup and a spare pump on hand that is easy to swap out.
Has your two years of research included building and running smaller aquaponics systems? You’ll learn so much from doing it firsthand, and experience is really the best teacher in aquaponics. If you’d like to share pictures of your system I’d be happy to write up a post on RAP Farms.
In your diagram it looks as if the bell siphons are out side the grow bed, is this correct? If this is correct, how do you have them plumbed? Supported? Can you add some pictures of the bells siphons and the plumbing? Thank you
Hello James. I would like to know if you would be interested in helping me set up a fish farm. You can reach me at 7863047257. Thank you so much. Great info
Where did you purchase your food-grade IBCs? Are they UV-Resistant? Do you cover them with something?
Looking to go the same route myself. Any info helps. Thanks.
I like the diagrams you have posted and have found them to be a very useful tool for my designs. I was wondering if you have any instructions or designs for your heating system. I live in the Canadian Rocky Mountains and winter temperatures here can easily reach -20-30 Celsius, so a heating system is essential for my greenhouse. I would like to use low cost alternative heating systems as much as possible to save on costs. I am very interested in how you designed and built yours. I would greatly appreciate any assistance you can give me and am open to all suggestions others may have. So far I’m looking at Rocket mass heaters, and a wind and solar power combination.
I appreciate any feedback.
I am in the process of building my first system. Thank you for sharing your ideas. I have 4 grow beds that are 4′ by 8′ by 1′ and filled with Lava rock. 2 pumps taking water from 2 275 gallon totes that I cut tops off. Now I have a useable 170 gallon from each. I also added a 300 (275 useable) gallon Rubbermaid tank due to a need of more water to buffer the level changes of the fill and drain beds. Filled with 275 gallons of lake water and the rest was well water. been adding ammonium for three days and now have measurable nitrites by no nitrates yet, maybe tomorrow. once I see nitrates and keep pH in the correct level will add 200 fingerling tilapia. Thanks to sites like yours I have had a blast learning and building this system. So thank you again for sharing.
Hi James,
I very much like your design and the information you have provided. I notice that the fish tanks are in series and wonder if there is a specific reason for this. In series the waste from one tank will need to flow through to the other. I guess this might mean two SLO’s or a modification of the one you have.
Looking forward to seeing more of your designs as I am in the process of building my first system.
Oh, I am in Brisbane Australia.
Cheers,
Dazza.
This looks fantastic. So many questions. I’m just getting into doing and have a 100 gallon Rubbermaid tank. Will start with goldfish and then catfish and another one later just with prawns. Want to have as low maintenance as possible. Is in hot central Texas climate. Will cut 55 gallon tanks long ways to use as grow beds. Also have a small greenhouse 4.5x6x6.5′. Any suggestions would be appreciated.
you have a concrete wall around your back yard? is there a moat on the other side of it? 🙂 awesome setup! there are no dates on this page that i can see… is this a current work in progress? i am anxious to watch as your plan becomes reality. i have two similar systems, both size-wise and component-wise. one is located inside my garage and runs year-round; the other is outside on a concrete slab and runs from may-november only. if you email me i will send pictures and a description. today is 11/9/14.
Thank you so very much for your generosity with your shared knowledge. I have been running, installing, and served as a consultant in the hydroponics/ aeroponics industry for the last six years. I have been trying research this option of aquaponics, mainly for my own gardens, and I must say, your attention to details and thorough coverage is quite impressive and greatly appreciated.
Love your design James..not simple but not complex either.. certainly looks about right for the intended purpose..
I wouldn’t bother with the permits.. Anything the government can give license to do within the legislative framework, you must be able to do outside of that framework otherwise the government are licensing unlawful activity.. DO NOT give in to their demands.. if they send you a notice, respond with a conditional acceptance but make your conditions impossible to meet.. Ask them to provide proof of claim for anything they say.. This is a very big topic but its one we must all know about if we are to reclaim our sovereignty and remove big government (corporations/glorified bank receivers) from our lives.. This whole regulating of food and craziness that is only worsening is related to Agenda 21 and Codex Alimentarius. you should research these things before acting as a ‘child’ and begging the government for permission to engage in lawful activity.. good luck with the aquaponics..i hope this helps to get you off their diseased ridden grid.
Regarding (A) above, why not mix heated water in the sump tank?
I would like to know about annual production of fish and crops from this system.
I am so excited to find this site! You are building exactly what I am planning! I have been planning for two years and I think it will start coming together soon. I want this same sort of set up, with a little tweaking. Since you haven’t posted any issues with cooling the water, I am wondering ic you have had to do anything. I live in east texas and am assuming I will need a chiller. Thank you so much for this site.
Can you explain how the sand filter is built or provide a picture. Is it as simple as sticking a pipe in a jar of sand?
I have a 35 gallon barrel I’m using as a radial flow filter, that catches a lot of the large waste before going into my sump. From my sump I pump to all my grow beds (qty 8 – 2’x3′) and my fish tank. After adding the filter I didn’t need to clean my pump at all last summer, where as before I had to clean it every couple weeks.
Last summer I turned one of my grow beds into a raft and noticed how much solid waste I was still getting into the system. I was thinking of adding another filter like I already have but saw your ‘Sand Filter’ and thought I might try that. I will also probably change which grow bed is my raft, since right now it is at the end of my water supply line which may be another reason I see all the waste in it.
I’m hoping to put up a green house this summer and will be redesigning my system, right now it’s outside so I only have the summer growing season.
Thanks,
Hi,
My name is Tom and I have requested IBC plans 1 and 2 on the web site and received no response. I am willing to pay, and I am trying to get information and knowledge about aquaponic growing.
Please let me know if you can help.
Blessings and Thanks,
Tom
Hey Fish-man,
I live in Canada. Plan to retire in Thailand. Have made many drawings and preparation to set up a small fish plant. Your design is one of the best. The break down of all parts and units are great. I can use many of what you describe and recommend.
All the stuff I can get in Thailand and it will safe me money to build the “Hatchery”
Thanks a lot I appreciate your contribution and this all for free.
Regards Max
My aquaponic sump and fish tank both have fish, is this OK?
Hello James,
Great blog that will help me with my (CHOP) aquaponics system build. I may have more questions in the future but for now can I ask why you used spacers (plywood) in the base of the grow beds? What was the reason for not just butting the lengths of timber flus up against each other?
Instead of plywood to finish the grow beds, I am considering using 6mm thick exterior fiber cement sheeting. Your thoughts if price compared to plywood was comparable?
Kind regards,
Andrew (Australia)
I’m very interested in aquaponics and I really love the way you used conduit to construct your own greenhouse. I just have to know, how were you able to bend the conduit so uniformly and perfectly at the top.
I assume you used some sort of liner on your grow beds, but it would have to be something both waterproof and thick enough not to get cuts or breaks when you add the media or you’ll have leaks.
I’m considering doing this in the desert in California, which gets super hot and super cold. I think I would have to buy a chiller for the summer which is about $1,000 and perhaps a heater in the winter to keep the fish alive. I’m not a fan of tilapia, and everyone sells it here in California as well as catfish. These are probably the most common fish out here due to the warm weather. I think if I could keep the water temperature low enough without the power bill getting out of hand, I may be able to raise trout which is a treat out here.
I haven’t put solar power on the house yet, but like aquaponics, it’s a plan for the future.
Any advice you can offer for someone who hasn’t built his first aquaponics setup yet is welcome. I’m considering doing a mini version as sort of a science experiment for my daughter, and to give me an idea of how to balance the fish to plant ratio and to sort of learn the process by doing.
Hello – I ran into your site. How is it working for you now?